 TRY THE T1D REGISTRY Demo
 FREE
FREE ADAPTABILITY
 DATA COMPLIANCE
TYPE 1 DIABETES REGISTRY TOOLKIT
T1D Bot and Patient application with the aim to
improve self-care managment and awareness
Est eveniet ipsam sindera pad rone matrelat sando reda
Omnis blanditiis saepe eos autem qui sunt debitis porro quia.
Exercitationem nostrum omnis. Ut reiciendis repudiandae minus. Omnis recusandae ut non quam ut quod eius qui. Ipsum quia odit vero atque qui quibusdam amet. Occaecati sed est sint aut vitae molestiae voluptate vel
T1D Registry
Resource Library
Resource Library
Select a topic from the left navigation to view content.
Overview
T1D Ecosystem Background and Conceptual Framework
This resource library supports you through the full process of implementing and deploying the T1D Registry. The library includes technical documentation and deployment guidance, with the full open-source codebase available via GitHub and in the Source Code section. It provides a clear, practical onboarding guide for adapting the platform to your local context, including assessing existing health systems, configuring data models and dashboards, and ensuring that facilities, providers, and workflows are effectively connected.
The open-source Type 1 Diabetes (T1D) Registry is designed to support countries in strengthening the delivery, monitoring, and planning of T1D care through a single, integrated digital platform. It enables the secure management of patient-level data across the full care pathway, from historical records to real-time case management, while supporting national reporting, dashboards, and long-term health system planning
Introduction to the Type 1 Diabetes (T1D) Digital Registry
Type 1 diabetes (T1D) is a lifelong autoimmune condition that prevents the body from producing insulin, leading to elevated blood glucose levels and, if untreated, severe complications and premature death. In 2022, an estimated 8.75 million people were living with T1D globally, including 1.52 million children under the age of 20. At present, there is no cure or prevention; lifelong insulin therapy remains the only effective treatment.
In low-resource settings, children and young people living with T1D are frequently misdiagnosed or lack sustained access to essential healthcare services, resulting in poor outcomes. Changing Diabetes® in Children (CDIC), is a public-private partnership founded in 2009 that aims to help provide diabetes care to children and youth with type 1 diabetes living in low and middle-income countries. This can include free life-saving medicine, blood glucose monitoring equipment and medical supplies for young people under the age of 25. Also, CDIC supports the development of global digital solutions for type 1 diabetes in low-resource settings
A persistent challenge in low-and-middle income countries has been the absence of standardized, high-quality longitudinal patient data. Reliable data is essential for monitoring patient outcomes, optimizing treatment protocols, strengthening service delivery, and advancing research in diabetes care.
Dure Technologies partnered with Novo Nordisk through Changing Diabetes® in Children, to develop the CDIC T1D Registry. Drawing on Dure’s experience implementing digital health systems in low- and middle-income countries, this digital registry is designed to improve data quality, strengthen reporting, and ultimately enhance the quality of care and life outcomes for children and young people living with T1D.
Key Principles
OPEN-SOURCE POLICY:
The platform is built on open-source technologies already supported by the country.
INTEROPERABLE:
The T1D platform is interoperable with other data ecosystems in the country (e.g., DHIS2).
PLATFORM OWNERSHIP:
Since the platform is built on an open-source technology stack, the complete ownership lies with the country.
DATA OWNERSHIP:
The Ministry of Health is the primary owner of the data and will have access to any health data processed by installations of the platform or partners.
LOCAL CAPACITY BUILDING:
The platform can be managed by existing technical resources within the countries.
HOSTING AND DEPLOYMENT:
The platform is hosted in MOH-recommended servers within the country.
COMPLIANCE:
The T1D platform is fully compliant with data security and privacy policies of the country.
CONFIGURABILITY:
The KOLs can themselves manage the platform leveraging the configuration setup.
CO-CREATION:
Any digital health system should be developed through a consultative and co-creation approach involving all key stakeholders.
Conceptual Framework and Continuum of Care
The T1D Digital Framework is designed to support individuals across the full continuum of care, from diagnosis through long-term disease management. It integrates patient-level data collection, clinical management, and multilevel monitoring into a single, unified digital ecosystem.
Each patient's care journey begins with digital registration, followed by socio-economic assessment and screening for comorbidities or complications. This information informs personalized clinical management, including insulin therapy, routine follow-up, and patient education.
The system supports regular laboratory monitoring of key indicators such as blood glucose and HbA1c, alongside ongoing tracking of complications including retinopathy and cardiovascular risks. By centralizing these processes, the framework improves continuity of care while generating high-quality data for programmatic and policy decision-making at national level.
Digital Architecture Supporting the Continuum of Care
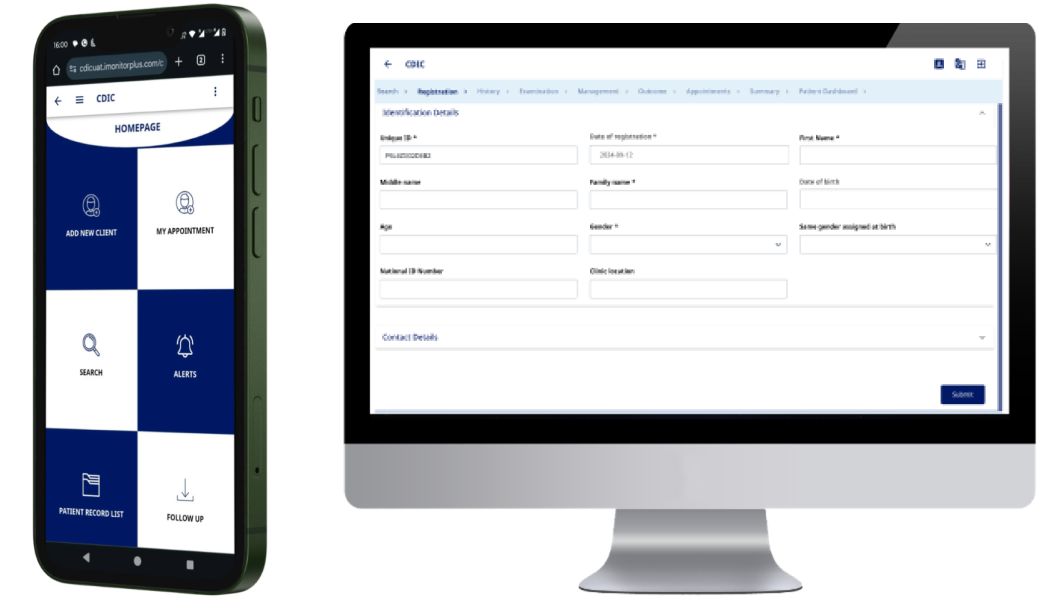
- Web Application
Enables healthcare professionals to access patient records, review treatment plans, and update clinical information in real time. - Smartphone Application
Supports outreach workers, patients, and caregivers with appointment scheduling, medication reminders, and data entry such as glucose readings. - External APIs
Facilitate interoperability with national health information systems and external platforms to enable seamless data exchange. - Historical Data Migration
Supports import of legacy patient data from Excel or paper-based systems to ensure continuity of care.
Key Actors in the System
- Outreach Workers: Connect patients in rural or underserved areas to care, education, and follow-up services.
- T1D Counsellors: Provide psychosocial support and guidance for patients and caregivers.
- Treatment Supervisors: Monitor treatment adherence, particularly insulin use and lifestyle adjustments.
- Testing Supervisors: Oversee laboratory testing schedules and quality assurance.
Data Integration, Monitoring, and Hosting
- Integration with National Systems
The registry integrates with national platforms such as DHIS2, HMS, and eLMIS to support country-wide reporting and planning. - Multilevel Monitoring & Evaluation Dashboard
Real-time dashboards enable monitoring of outcomes at national, regional, district, and facility levels, supporting evidence-based decision-making and resource allocation. - Cloud-Based Hosting
Secure cloud infrastructure ensures scalability, data protection, and continuous system improvement. - Comprehensive Data Element Configuration
Supports flexible creation of DHIS data elements using multiple input types (e.g. checkboxes, radio buttons, structured fields).
Registry and Products
T1D Digital Registry
The CDIC T1D Digital Registry is the core of a global ecosystem designed to support the full data, clinical, and operational journey of people living with Type 1 Diabetes. It enables standardized data collection, analysis, patient engagement, and program monitoring across diverse country contexts.
The registry is structured around Core, Core+, Core++, and Core+++ variables, aligned with clinic workflows and best practices validated by Novo Nordisk and Harvard University, so it can also be used to contribute to GC-CDIC Global Cohort Study for type 1 diabetes. It is designed for country adaptation, with the flexibility to extend into full electronic medical records (EMR) where required.
Following initial assessments and secondary research, the global T1D registry was released and iteratively refined through country implementations in Cameroon, Ethiopia, and Malaysia. Feedback from country key opinion leaders, including consultations held at the World Health Assembly 2024, informed subsequent enhancements. The current production version (v1.6) incorporates robust validation rules, improved user experience, and strengthened data quality controls, jointly validated by Novo Nordisk and Harvard.
Please follow the link to see a demo module: LINK TO DEMO
Sandbox Model for Country Adaptation
To support contextualization at country level, the T1D platform incorporates a Sandbox Model. This allows countries to adapt the registry to their specific health system structures, indicators, and programmatic needs without altering the core global framework.
Key capabilities include:
Program Creation & Management
Configure and manage T1D programs using customizable registration forms and standardized data elements.
Stage & Sub-Stage Configuration
Structure data collection workflows across clinical and operational stages to reflect local care pathways.
Conditional Logic & Rules
Dynamically show, hide, or mandate fields based on predefined criteria to ensure data quality and relevance.
Multi-Language Support
Manage translations consistently across mobile applications, web platforms, and dashboards.
Search & User Management
Enable advanced patient search and automate user creation to streamline system deployment and scale-up.
This approach ensures consistency across countries while allowing flexibility to reflect national reporting requirements and care models.
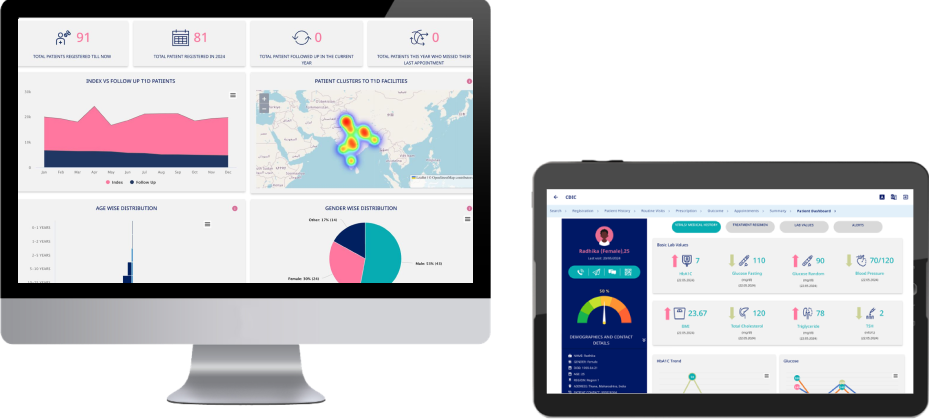
Clinical & Programmatic Dashboards
The T1D platform includes real-time dashboards designed to support clinical decision-making and program monitoring at facility, district, and national levels. These dashboards provide visibility into patient registration, follow-up, treatment adherence, complications, and service delivery performance. By translating registry data into actionable insights, they enable early identification of risks, improved care coordination, and evidence-based planning across the health system.
Patient & Provider Mobile Applications
Mobile applications extend the T1D ecosystem beyond the health facility, supporting both healthcare providers and patients in day-to-day disease management.
For providers, mobile tools enable data entry, follow-up tracking, and access to patient records in low-resource or outreach settings. For patients and caregivers, the applications support appointment scheduling, reminders, glucose logging, and access to personal health information, strengthening adherence and continuity of care.
Diagnostic Device Integration
The platform supports integration with diagnostic devices such as HbA1c testing machines, enabling automatic and secure transmission of test results directly into the T1D registry.
This reduces manual data entry, improves data accuracy, and ensures timely availability of clinical information for decision-making. Automated data capture strengthens trust in the system and supports high-quality reporting at facility and national levels.
Stock & Supply Chain Management
The stock management module supports the tracking of insulin and essential consumables across participating facilities.
It enables monthly inventory reporting, automated stock balance updates, threshold alerts, and visualization of consumption trends. By supporting cold-chain sensitive supply management and forecasting, this component helps prevent stock-outs and protects continuity of treatment for people living with T1D.
Why the Ecosystem Matters
Together, these components form an integrated, country-owned digital ecosystem that connects patient care with program management and national decision-making.
The T1D Digital Ecosystem improves health outcomes for individuals, strengthens national diabetes programs, and enables sustainable scale by combining standardized data, local adaptability, and real-time intelligence across the continuum of care.
Technical Requirements
T1D Technical Architecture
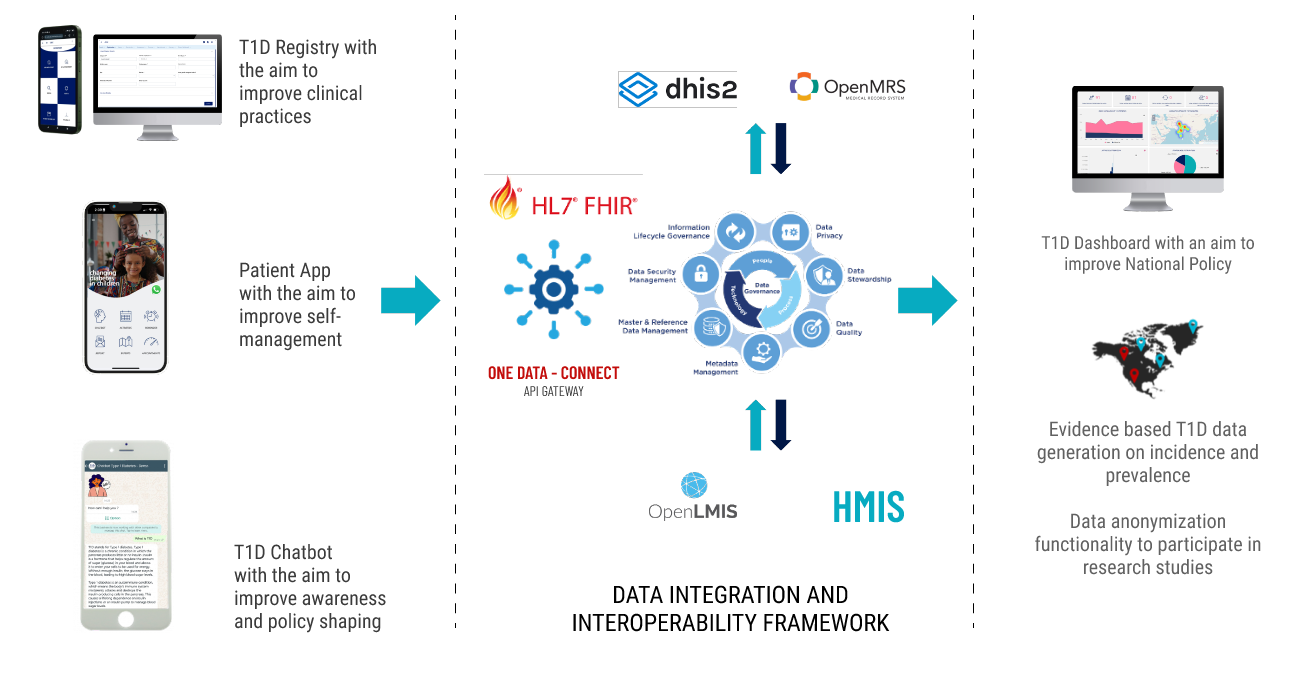
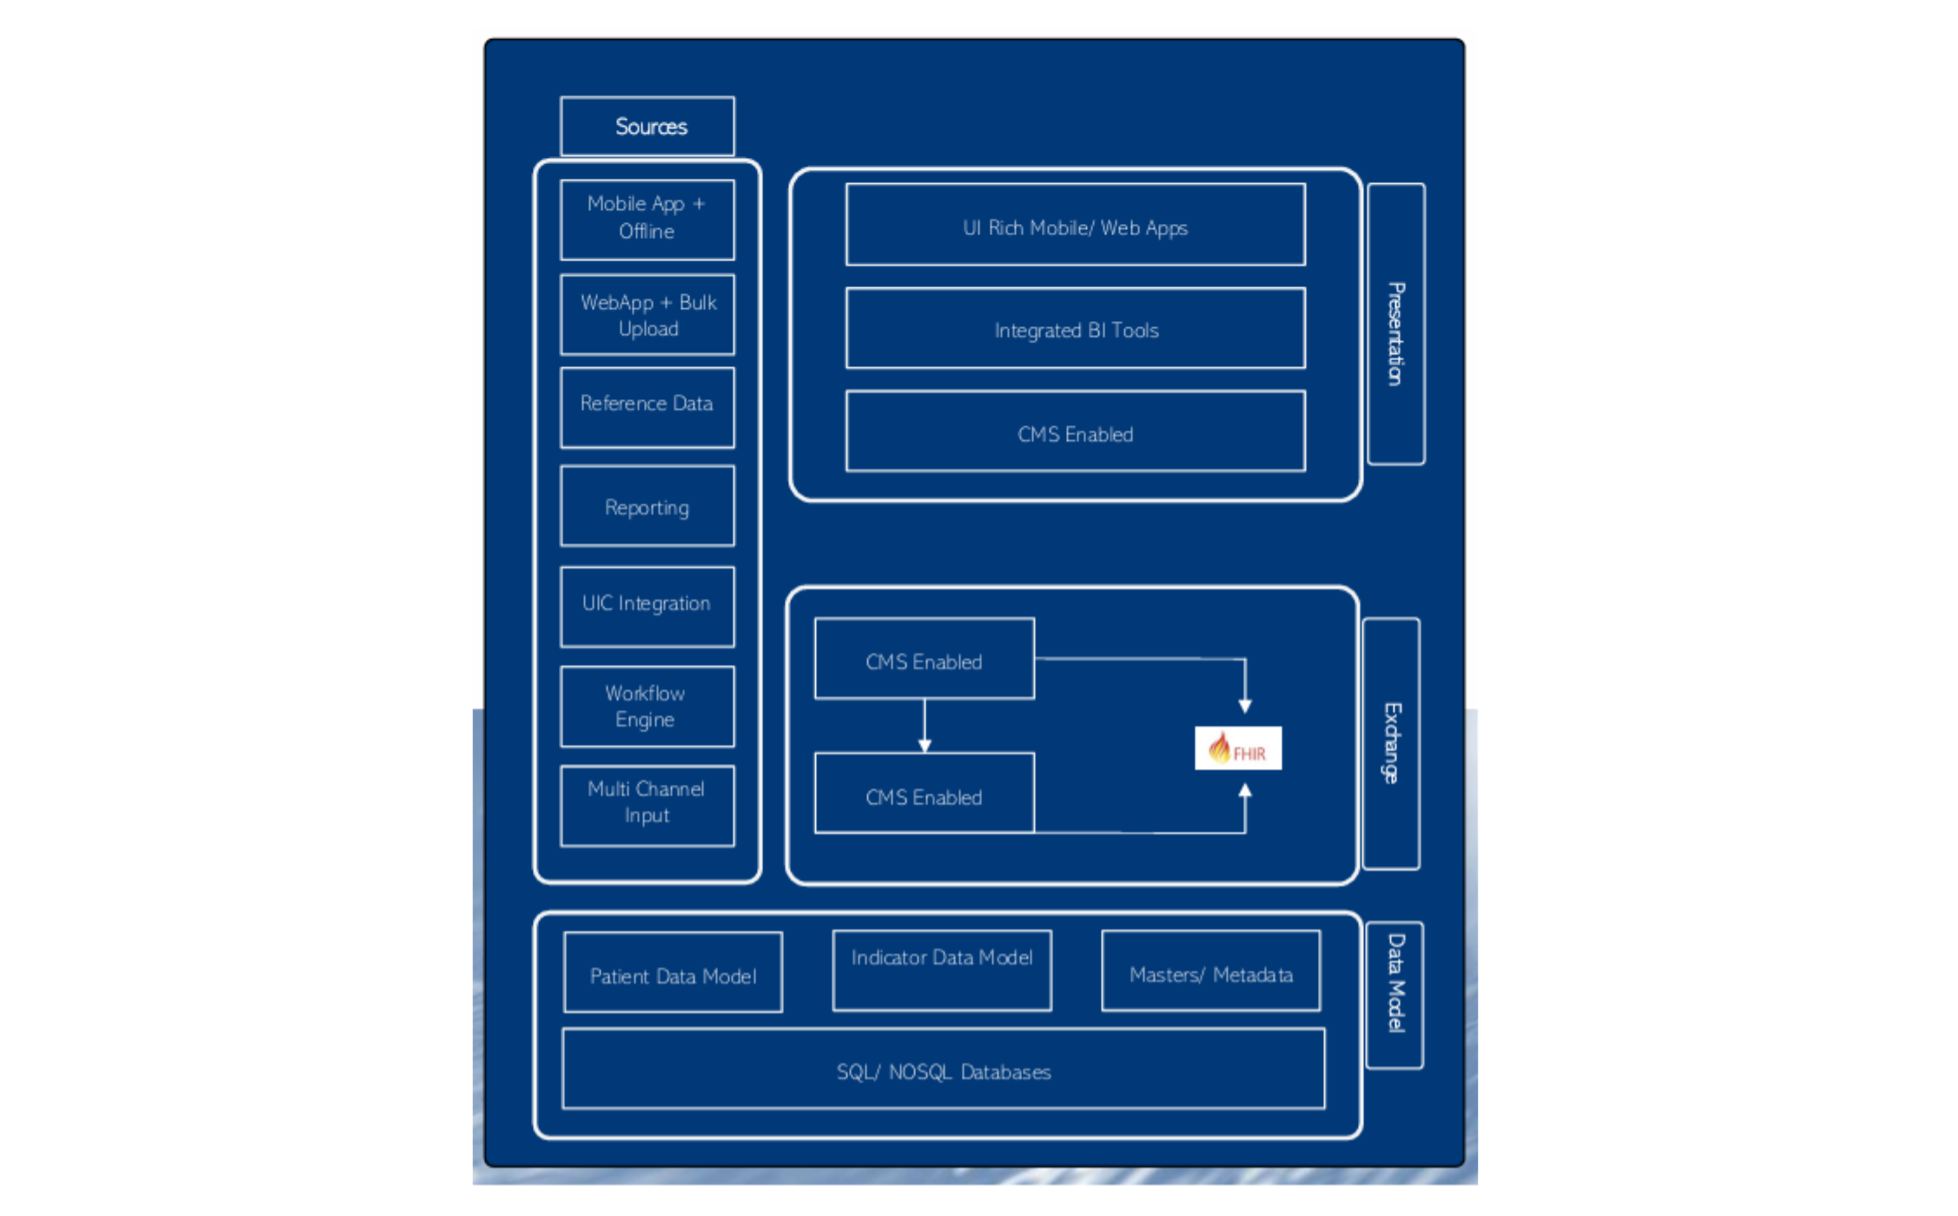
The T1D technical architecture is designed with data interoperability at its core, enabling seamless exchange and use of health information across existing national systems. This ensures that patient-level and programmatic data can be accessed, shared, and analyzed efficiently to support clinical care, program management, and policy decision-making.
Built on open-source technologies and guided by HL7 FHIR standards, the architecture integrates multiple health information systems into a unified, country-owned ecosystem. Dure’s interoperability layer enables existing platforms—such as DHIS2, CLM, routine health systems, and other applications—to exchange both case-based and aggregated data through a central health information exchange, avoiding duplication and maximizing efficiency.
A centralized master data management layer, including shared terminology services, registries, metadata libraries, and unique patient identifiers, ensures consistency and interoperability across systems. Together, these components provide a single, real-time view of patient and program data, strengthening data quality, system coordination, and evidence-based decision-making at national level.
T1D Technical Architecture
Server Sizing for T1D Registry
Server Sizing for T1D Registry
(1) Web Server
- VM CPU: 4 Core
- RAM: 16 GB
- HDD: 250 GB
- OS: Linux
(2) App Server
- VM CPU: 8 Core
- RAM: 64 GB
- HDD: 500 GB
- OS: Linux
(3) DB Server
- VM CPU: 4 Core
- RAM: 32 GB
- HDD: 250 GB
- OS: Linux - PostgreSQL
(4) Daily Backup / DR
- Azure ASR - Another compliant data centre
- BlobStorage for local images
Hosting and Deployment Standards
The open-source solution is designed to meet rigorous hosting, security, and compliance standards, while remaining flexible to country preferences and regulatory requirements. Deployment options prioritize data sovereignty, reliability, and alignment with local laws, allowing networks to select the hosting model that best fits their operational and legal context.
The platform supports both cloud-based and on-premises deployment. Cloud deployments are compatible with major cloud service providers and can be hosted within the country to comply with data residency requirements. This model enables scalability, automated updates, and security patching, and leverages industry-standard encryption to protect data both in transit and at rest.
For organizations requiring full infrastructure control, the on-premises deployment option allows the system to be hosted on local servers. Comprehensive deployment documentation supports secure installation and configuration, ensuring compliance with national privacy and data protection regulations.
To maintain long-term compliance, the solution continuously adapts to evolving data protection laws. Regular software updates incorporate regulatory enhancements, ensuring that deployments remain secure, compliant, and aligned with current legal frameworks over time.
Implementation of Registry
Introduction
Changing Diabetes® in Children (CDIC) aims to provide comprehensive care for children and adolescents with Type 1 Diabetes (T1D) in low- and middle-income countries. A very important component of this effort is the T1D e-Registry, a digital platform that helps countries track and manage diabetes cases, ensuring better patient care and more efficient use of healthcare resources. CDIC is helping to close this gap by supporting the development of the T1D e-registry, which is available as a global public good.
As each country has unique healthcare systems, data needs, and regulations, the platform has to be adapted accordingly.
This document provides a clear and practical guide for countries looking to onboard the T1D e-Registry, explaining the key steps involved in tailoring the platform to fit their local context. The onboarding process involves assessments of current healthcare systems, adaptation of data and dashboards, and ensuring all elements from historical data to real-time case management, work effectively together.
Self-Guided Implementation Steps for the T1D Registry
For self-guided implementation of the T1D registry please ensure you have a server ready that can host the registry. The server requirements for hosting the CDIC T1D Registry solution will depend on factors like the number of users, data volume, and expected performance. Generally, we recommend a server with:
- Web Server:
- VM CPU: 4 Core
- RAM: 16 GB
- HDD: 250 GB
- OS: Linux
- App Server:
- VM CPU: 8 Core
- RAM: 64 GB
- HDD: 500 GB
- OS: Linux
- DB Server:
- VM CPU: 4 Core
- RAM: 32 GB
- HDD: 250 GB
- OS: Linux-PostgreSQL
- Daily Backup / DR:
- Azure ASR - Another compliant data centre
- BlobStorage for local images
To access the Source Code, please follow the steps outlined in the GitHub.
To set up the registry, please follow the Deployment Guide in the Resource Library.
Once the registry is deployed on your server, refer to the Admin User Manual for configuration and system setup, including creating users and facilities, and uploading data.
Healthcare providers can then use the Provider User Manual to learn how to operate the registry, including registering new patients, recording medical history, and documenting current visits.
Implementation Steps for the T1D Registry Supported by Dure Technologies
Contact us at contactus@t1dreg.com to set up a meeting to discuss implementation support.
Dure Technologies will then support you through the process outlined below:
- Assessment and Country Workplan Development
Conduct detailed assessment of historical/existing data and map them to core indicators. Develop a BRD along with a workplan with timeline. - Data Management Agreement Signing with Countries
Development of data management agreement draft, conduct review and final signing. - Hosting and Deployment
Finalization of hosting environment with technical discussion and deployment of country instance. - Adaptation of Platform
The platform is adapted based on the conducted assessment findings for the country and integration with the existing systems with historical data upload module. Followed up with UAT testing for review and sign-off. - Implementation and Roll-out
In-country training (TOT) with training document followed up with roll-out of platform and continuous project governance and technical support.
Key Steps for Adoption of T1D Registry Supported by Dure Tech
The adoption of the CDIC T1D e-Registry involves several critical steps to meet the unique requirements of each country. The goal is to seamlessly integrate the registry into national health systems for better management of T1D cases.
- Country Specific Assessment:
This step involves an assessment of existing historical data. It includes mapping current indicators with CDIC indicators for alignment. Evaluation of hosting and deployment needs is performed, along with adaptation requirements for data variables, indicators, dashboards, reports, and users. Country-specific business requirement documents are developed for approvals. Integration with other data systems is assessed to ensure seamless data flow and compatibility.
- Adaptation of CDIC T1D Platform Based on Country Specific Needs:
This step focuses on tailoring the CDIC T1D platform to specific country needs. Adjustments are made to data variables, business rules, and workflows. Dashboards are customized to align with local requirements. Historical data migration is conducted by configuring country-specific data upload modules. The process concludes with thorough user acceptance testing to ensure functionality and meet local expectations.
- Development and Integration of Inventory Management Module:
This section describes the design and development of a comprehensive health product supply chain and inventory module. Its purpose is to ensure efficient management of medical supplies. The module tracks the entire supply chain, from procurement to distribution. It helps monitor inventory levels, ensuring timely replenishment and preventing stockouts. The module would integrate auto-stock deduction linked to prescriptions, ensuring seamless medication management for patients.
- Development and Integration of Patient Centric Module:
Several countries have expressed interest in this module, which aims to empower T1D patients and their caregivers. The module would provide access to vital information. Features include appointment booking, ability to locate nearby T1D health facilities, and sending follow-up reminders. The source code for this module is available through Dure Technologies, and interested parties should contact contactus@t1dreg.com. Key features include social behavior change communication (SBCC), a community forum, appointment scheduling, and automated follow-up reminders. Additionally, the module
- Hosting Deployment:
The deployment of the CDIC T1D platform will be carried out on the designated country server, as agreed upon with the country implementation partner. This will be followed by remote technical support to manage regular upgrades, address change requests, and resolve any bug fixes.
Additionally, the platform will adhere to all data security and privacy measures in line with the respective country's policies, ensuring compliance and safeguarding patient information.
- Training and Roll-out of the Application:
The development of training materials will encompass a range of resources, including training videos, eLearning modules, and comprehensive training manuals. In addition to creating these materials, ongoing training will be provided to key stakeholders in the country, both on-site and off-site, ensuring that all users are well-equipped to utilize the CDIC T1D platform effectively.
Key Learnings from Implementation
Digital Readiness Assessment
A critical early step in implementation was assessing the readiness of CDIC/COE clinics to adopt a digital T1D registry. Key dimensions evaluated included digital capacity, existing health information systems, health records infrastructure, legal and regulatory requirements, facility workflows, and the roles and capacities of healthcare staff.
This assessment revealed significant variation across countries and facilities. As a result, a standardized digital readiness assessment framework was developed, enabling future wave countries to be evaluated in a consistent and efficient manner. This framework now serves as the foundation for informed system design and deployment planning.
Country Adaptation Standardization
The country adaptation process was conducted at multiple levels, including analysis of data variables, mapping of core indicators, adaptation of clinical workflows, updating of taxonomies, and validation of data rules based on insights from Wave 1 countries.
These learnings led to the development of a comprehensive adaptation framework and standardized adaptation form, which can be used by subsequent countries. This approach ensures that the registry remains globally standardized while being locally relevant, compliant with national regulations, and aligned with country-specific healthcare practices.
1. Country Data Entry Framework
A structured data entry framework was established to define how patient data is collected, formatted, validated, and entered into the registry. This framework clarifies roles and responsibilities for data entry, outlines quality assurance processes, and specifies mechanisms for identifying and correcting errors.
2. Role-Based Access Aligned with Patient Flow
Country assessments highlighted significant variation in patient pathways and clinical workflows across facilities. Understanding these patient touchpoints was essential to designing a role-based access model aligned with real-world practice.
The registry was therefore configured to assign differentiated access rights based on staff roles and workflow responsibilities. For example, laboratory personnel are authorized to enter lab values, while clinicians retain the ability to review, interpret, and modify clinical data. This approach enhances data integrity while aligning system functionality with operational realities.
3. Master Data Variable Taxonomy
A standardized taxonomy of data variables was developed to ensure consistent classification and organization of patient information across countries. This taxonomy defines categories such as demographics, clinical indicators, complications, and treatment data.
Establishing a clear taxonomy has been critical for harmonizing data collection, enabling cross-country comparability, and supporting meaningful analysis and reporting. This process culminated in the development of the Global T1D Registry with standardized variables validated by multiple stakeholders.
4. Standardization of Data Units
Implementation revealed that countries use different measurement units and clinical conventions for key indicators. To address this, standard units of measurement were defined while allowing flexibility for local adaptation through the Smart Setup Sandbox.
This approach ensures data consistency and comparability across facilities and countries, while maintaining the flexibility required to accommodate national practices and clinical norms.
5. Historical Data Integration
Although the registry includes a historical data upload module, implementation revealed that many Wave 1 countries had incomplete, inconsistent, or low-quality legacy data. This posed challenges for accurate migration into the new system.
To address this, variable-specific validation logic was developed, alongside a data error identification mechanism that allows users to pinpoint and correct issues in upload files. To date, more than 10,000 historical T1D patient records have been successfully integrated into the registry across participating countries, strengthening longitudinal patient tracking and continuity of care.
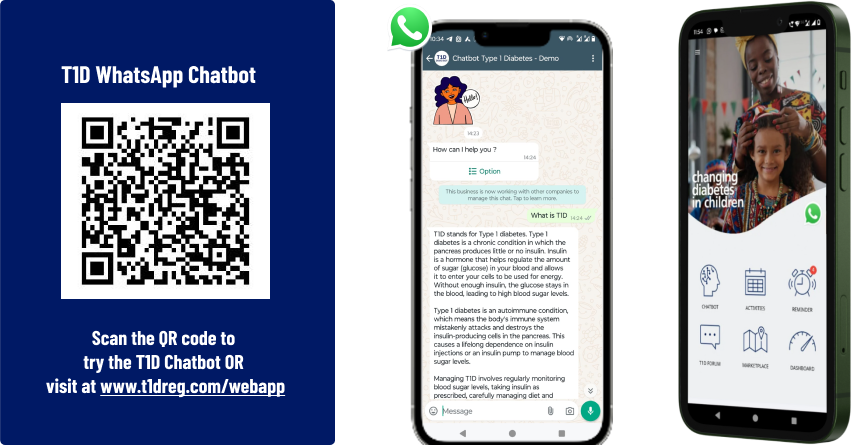
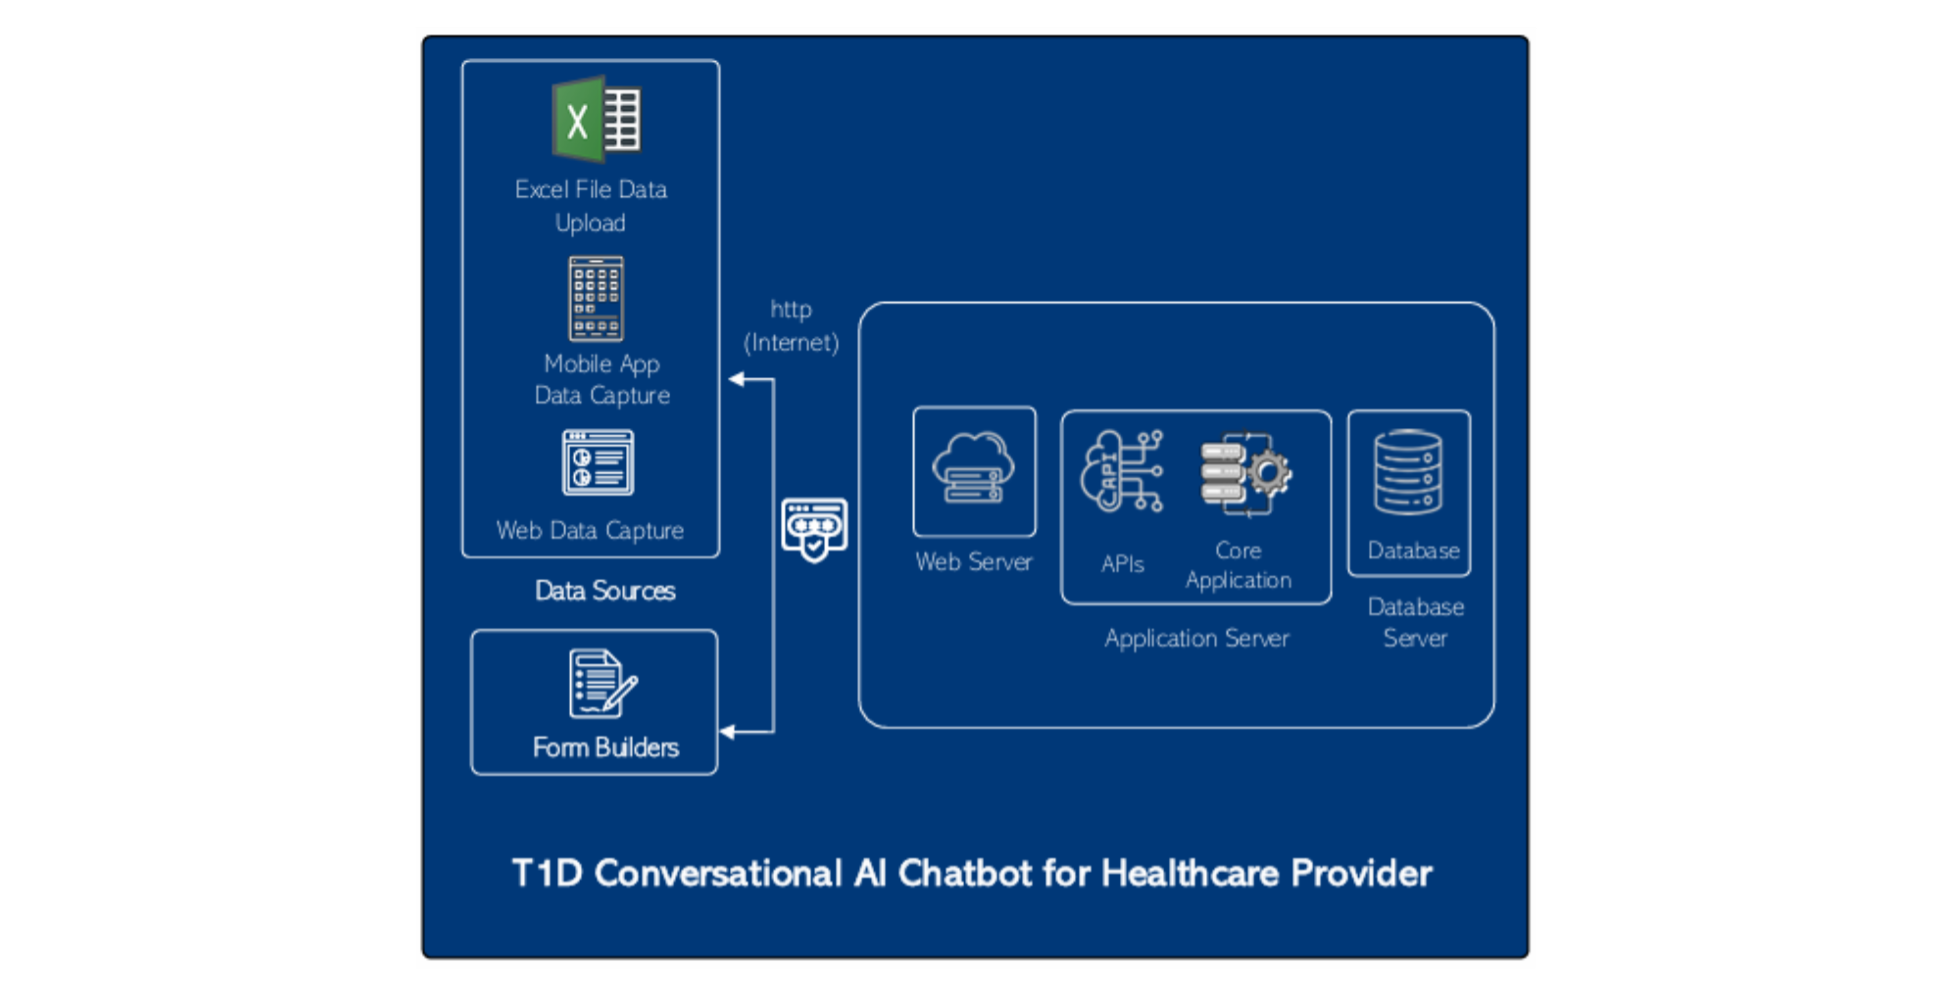
6. Integration with Patient App and Conversational AI
The integration of the T1D registry with the patient mobile application and conversational AI chatbot enables seamless interaction between patients and the health system. Patients can access health information, receive reminders, track key metrics, and communicate with healthcare providers through digital channels.
Key benefits include:
- Enhanced patient engagement, enabling individuals to actively participate in their care
- Real-time data synchronization, ensuring clinicians have up-to-date patient information
- Improved communication, through reminders, notifications, and secure messaging
- Greater accessibility, supporting continuity of care beyond the health facility
However, implementation also revealed disparities in digital access. In several Wave 1 countries, limited mobile phone ownership and internet connectivity constrained patient-level adoption. In contrast, countries such as India, Pakistan, and Malaysia, with higher digital penetration, provide valuable insights into future scalable use cases.
These findings highlight the importance of designing digital health solutions that are both technologically advanced and contextually appropriate, ensuring equitable access across diverse settings.
Privacy and Security
Data Security
The solution implements a robust, end-to-end data security framework designed to protect the integrity, confidentiality, and availability of sensitive health information. Security is embedded not only in the technology but also in governance processes and user practices, ensuring shared responsibility across the system.
Data Ownership and Governance
Data ownership is clearly defined within the system, establishing accountability and transparency in how information is managed. Access to data is restricted to authorized individuals or entities in line with defined ownership and governance policies, ensuring responsible data stewardship across the network. Data is hosted in-country, following local regulations.
Encryption and Data Protection
All data is protected using industry-standard encryption protocols. Information is encrypted both at rest and in transit, safeguarding sensitive data from unauthorized access, interception, or misuse and ensuring alignment with global best practices for digital security.
Role-Based Access Control
The platform applies granular, role-based access controls aligned with user responsibilities. Each user is assigned specific permissions that determine what data they can view, enter, or modify, minimizing the risk of unauthorized access or unintended data changes.
Multi-Factor Authentication (MFA)
To strengthen user authentication, the system supports Multi-Factor Authentication (MFA). This additional security layer reduces the risk of unauthorized access by requiring multiple forms of identity verification.
Audit Trails and Monitoring
Comprehensive audit logs capture all data access and modifications within the system. These audit trails support accountability, enable security investigations, and facilitate compliance audits by providing full traceability of user activity.
Data Security Protocols
Standardized data security protocols define how information is handled, processed, and shared across the platform. These protocols ensure consistent application of security practices and compliance with relevant regulatory and industry standards.
Security Awareness and Training
Security training is integrated into user onboarding to promote awareness of best practices and responsible data handling. This proactive approach reduces the likelihood of security incidents arising from human error and strengthens the overall security posture of the system.
FAQ
-
How will patient data be hosted within the country, and what are the defined roles and responsibilities of stakeholders regarding data access control?
- Patient data will be hosted on secure servers within the country, adhering to local data sovereignty regulations. Data access within registry will be based on defined roles and responsibilities, ensuring that only authorized stakeholders (healthcare providers, administrators, etc.) can access specific data sets. Clear data access policies and procedures will be defined and enforced to maintain patient privacy and data security.
What data encryption methods are implemented for data both in transit and at rest, specifically detailing the encryption of critical NPI's?
- Patient data is encrypted using AES-256 bit technology for both data in transit (using HTTPS/TLSv1.2+ API communication) and data at rest (within the database). Individual patient NPIs will be de-identified in the UI and database to protect sensitive patient information from unauthorized access.
- Please note data at rest is yet not implemented.
-
How is role-based access control implemented within the Registry system to keep patient data secure and confidential?
- Registry utilizes OAuth2 built-on role-based access control system. User roles are defined based on job functions (e.g., doctor, nurse, administrator), and permissions are assigned to these roles. This ensures that users only have access to the data and functionalities necessary for their tasks. For example, a doctor might have read-write access to relevant clinical records, while a data analyst might have read-only access for reporting purposes.
- Role-based access needs to be defined properly in the application.
-
How does the Registry application handle offline functionality, and what mechanisms are in place to ensure data synchronization when internet connectivity is restored?
- The application, particularly the custom UI, is designed to support offline data entry. When internet connectivity is unavailable, data is stored locally on the device (e.g., using local storage or a local database like CouchDB). Once connectivity is restored, the application provides a link to sync the data into the database which synchronizes the locally stored data via API calls, ensuring data consistency.
-
How does the CDIC T1D Registry, deployed on an on-premise intranet, manage offline functionality and ensure data synchronization within the local network, and what server specifications are required?
- In an on-premise intranet setup, the CDIC T1D Registry system uses a local database (like CouchDB) to store data when the connection to the central CDIC server is interrupted. Data is synchronized with the server when the connection is restored. The server and client applications can operate independently within the intranet, ensuring continuity of service. The server specifications should be reviewed to ensure they meet the application's performance and data storage requirements, considering factors like user concurrency, data volume, and network bandwidth.
- As discussed for now we are not showing the offline functionality, please make sure that you don't add any data when the system is offline i.e. not connected to internet/intranet.
-
How can maintenance and updates be performed on the CDIC T1D Registry system in environments with limited or no internet connectivity?
- Maintenance and updates for the CDIC system can be conducted offline by providing update packages and detailed installation instructions. These packages can be distributed via physical media or a local network.
-
What are the recommended server hardware and software specifications for hosting the CDIC T1D Registry solution?
- The server requirements for hosting the CDIC T1D Registry solution will depend on factors like the number of users, data volume, and expected performance. Generally, we recommend a server with:
- Web Server:
- VM CPU: 4 Core
- RAM: 16 GB
- HDD: 250 GB
- OS: Linux
- App Server:
- VM CPU: 8 Core
- RAM: 64 GB
- HDD: 500 GB
- OS: Linux
- DB Server:
- VM CPU: 4 Core
- RAM: 32 GB
- HDD: 250 GB
- OS: Linux - PostgreSQL
- Daily Backup / DR:
- Azure ASR - Another compliant data centre
- BlobStorage for local images
Server Setup
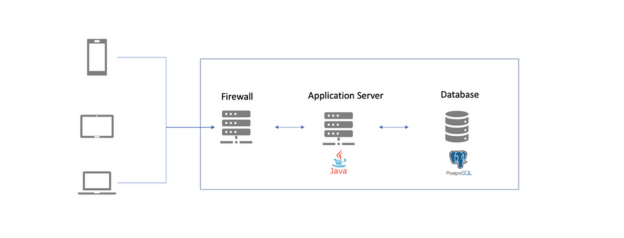
Type 1 Diabetes Registry Application - Deployment Architecture
This outlines a deployment architecture for Type 1 Diabetes Registry Application web-based application, suitable for Type 1 Diabetes Registry Application programs. The architecture emphasizes modular design, security, and flexibility, making it adaptable, it highlights core infrastructure components, software layers, integration points, and security measures essential for reliable and efficient application delivery.
The following sections detail the core components, deployment layers, infrastructure specifications, and additional extensions required for successful implementation.
1. Core Components
- Web Application (Backend and Frontend)
- PostgreSQL Database
- OS: Ubuntu 22.04
- Nginx/Apache HTTP Server (Optional for SSL termination)
- Backup & Recovery System
- Domain or Subdomain with SSL certificate
- Email Server (SMTP server details)
2. Deployment Layers
Client Layer (End-Users)
- Devices: Desktop Browsers, Mobile phones, Tablets
- Access via: HTTPS (secured with SSL/TLS)
- Usage: Data entry, reports, dashboards, tracker capture, custom app access
Application Layer (DHIS2 Server)
- Web API (Tomcat)
- Core Application (WAR)
- Web Server (Optional: Nginx or Apache for load balancing, reverse proxy, SSL)
- Tech Stack: Tomcat 9+, Java 11/17, DHIS2 (latest stable or LTS)
Database Layer
- PostgreSQL (13+, can be V16)
- Data partitions (for large datasets if needed)
- Regular Backups (daily incremental, weekly full)
- Hosting: On the same VM or separate VM for better performance
3. Infrastructure Components
- App Server VM: 8 vCPU, 16–32 GB RAM, 200 GB Disk
- DB Server VM: 4 vCPU, 8–16 GB RAM, 256 GB SSD Disk
- Firewall: As per Network/guidelines
4. Security Layer
- SSL/TLS encryption for all web traffic
- User authentication: Two-factor authentication (2FA) – Email / Google Auth
- Database security: Encrypted backups, secure PostgreSQL access
- Firewall: Restrict access to specific IP ranges
5. Custom Needs / Extensions
Integrations: External systems (LMIS, EMR, Lab systems); SMS/IVR Gateway (for community health workers); Mobile apps (DHIS2 Tracker Android App or custom).
Backup & Monitoring: Automated backups (pg_dump + rsync to secure storage); Monitoring as per guidelines.
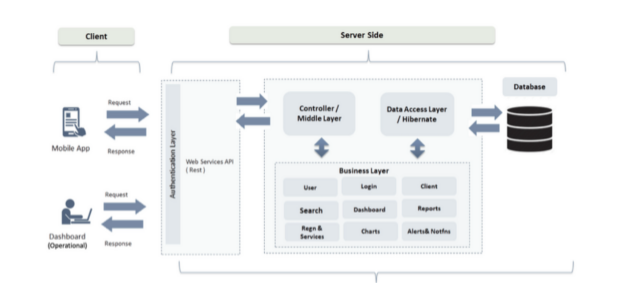
6. Deployment Diagram
7. Minimum Recommended Versions
| Component | Version |
|---|---|
| Java | 11 or 17 |
| PostgreSQL | 13+ (could be V16) |
| Tomcat | 9 |
Linux Server Setup
Project Details
We need the below things to set up the application, Database and Frontend.
- JAVA 11
- APACHE TOMCAT 9.0.59
- POSTGRESQL 16.x
- Linux server
Installation of JAVA 11 on the Application Linux server
For Ubuntu/Debian:
sudo apt update
sudo apt install openjdk-11-jdk -y
For CentOS/RHEL:
sudo yum install java-11-openjdk-devel -y
Verify installation:
java -version
javac -version
1) Installation of APACHE TOMCAT 9 on the Application Linux server
Create tomcat user
sudo useradd -m -U -d /opt/tomcat -s /bin/false tomcat
Download Tomcat 9
cd /tmp
wget https://downloads.apache.org/tomcat/tomcat-9/v9.0.59/bin/apache-tomcat-9.0.59.tar.gz
Extract to /opt/tomcat
sudo tar -xf apache-tomcat-9.0.59.tar.gz -C /opt/tomcat/
sudo mv /opt/tomcat/apache-tomcat-9.0.59 /opt/tomcat/tomcat9
sudo chown -R tomcat:tomcat /opt/tomcat/tomcat9
sudo chmod -R u+x /opt/tomcat/tomcat9/bin
Create systemd service file
sudo nano /etc/systemd/system/tomcat.service
2) Add the following content to the service file:
[Unit]
Description=Tomcat 9 servlet container
After=network.target

[Service]
Type=forking
User=tomcat
Group=tomcat
Environment="JAVA_HOME=/usr/lib/jvm/java-11-openjdk-amd64"
Environment="JAVA_OPTS=-Djava.security.egd=file:///dev/urandom -Djava.awt.headless=true"
Environment="DHIS2_HOME=/opt/dhis_config"
Environment="CATALINA_BASE=/opt/tomcat/tomcat9"
Environment="CATALINA_HOME=/opt/tomcat/tomcat9"
Environment="CATALINA_PID=/opt/tomcat/tomcat9/temp/tomcat.pid"
Environment="CATALINA_OPTS=-Xms512M -Xmx1024M -server -XX:+UseParallelGC"
ExecStart=/opt/tomcat/tomcat9/bin/startup.sh
ExecStop=/opt/tomcat/tomcat9/bin/shutdown.sh
RestartSec=10
Restart=always

[Install]
WantedBy=multi-user.target
3) Reload systemd and start Tomcat
Reload systemd and start Tomcat
sudo systemctl daemon-reload
sudo systemctl start tomcat
sudo systemctl enable tomcat
Verify Tomcat is running
sudo systemctl status tomcat
Validate Tomcat User
Check: ps -ef | grep tomcat
Ensure the same user owns:
/opt/dhis_config
Installation of PostgreSQL 16.x on the Application Linux server
POSTGRESQL INSTALLATION ON LINUX:
For Ubuntu/Debian:
sudo sh -c 'echo "deb https://apt.postgresql.org/pub/repos/apt $(lsb_release -cs)-pgdg main" > /etc/apt/sources.list.d/pgdg.list'
wget --quiet -O - https://www.postgresql.org/media/keys/ACCC4CF8.asc | sudo apt-key add -
sudo apt update
sudo apt install postgresql-16 postgresql-16-postgis-3 -y
For CentOS/RHEL:
sudo dnf install -y https://download.postgresql.org/pub/repos/yum/reporpms/EL-8-x86_64/pgdg-redhat-repo-latest.noarch.rpm
sudo dnf -qy module disable postgresql
sudo dnf install -y postgresql16-server postgresql16-contrib postgis31_16
sudo /usr/pgsql-16/bin/postgresql-16-setup initdb
sudo systemctl enable postgresql-16
sudo systemctl start postgresql-16
PostgreSQL Database Setup
Switch to postgres user
sudo -u postgres psql
Create database and user (run inside psql):
CREATE USER {replace_your_db_username} WITH ENCRYPTED PASSWORD 'your_secure_password';
CREATE DATABASE {replace_your_db_name} OWNER {replace_your_db_username};
GRANT ALL PRIVILEGES ON DATABASE {replace_your_db_name} TO {replace_your_db_username};
Enable PostGIS extension
\c {replace_your_db_name}
CREATE EXTENSION postgis;

In case of any issue add below extension:
CREATE EXTENSION btree_gin;
CREATE EXTENSION pg_trgm;
CREATE EXTENSION tablefunc
Exit PostgreSQL
\q
Restore Database
Extract blankDB.rar (provided in the git repo.)
Inside the extracted folder you will find: staging_blankDB (SQL Source File)

First open the staging_blankDB SQL file and replace {replace_your_db_username} with your actual database username in the following line:

GRANT ALL ON SCHEMA public TO {replace_your_db_username}

Run the following command to restore the DB from the staging_blankDB file location:

psql -U {replace_your_db_username} -d {replace_your_db_name} < staging_blankDB
Nginx Web Server Installation and Configuration
Install Nginx
sudo apt install nginx -y
or
sudo yum install nginx -y
Start and enable Nginx
sudo systemctl start nginx
sudo systemctl enable nginx
Create an Nginx configuration file for your application
sudo nano /etc/nginx/sites-available/domain.com.conf
Add the following configuration (adjust the domain name as needed):
server {
    listen 80;
    server_name your-domain.com www.your-domain.com;

    # Proxy settings for Tomcat service
    location /service/ {
        proxy_pass http://localhost:8080/service/;
        proxy_set_header Host $host;
        proxy_set_header X-Real-IP $remote_addr;
        proxy_set_header X-Forwarded-For $proxy_add_x_forwarded_for;
        proxy_set_header X-Forwarded-Proto $scheme;
    }

    # Static content for frontend
    location / {
        root /var/www/cdic;
        index index.html index.htm;
        try_files $uri $uri/ =404;
    }

    # Additional proxy settings if needed
    location /cdicv2/ {
        proxy_pass http://localhost:8080/cdicv2/;
        proxy_set_header Host $host;
        proxy_set_header X-Real-IP $remote_addr;
        proxy_set_header X-Forwarded-For $proxy_add_x_forwarded_for;
        proxy_set_header X-Forwarded-Proto $scheme;
    }
}
3) Enable the site
sudo ln -s /etc/nginx/sites-available/cdic /etc/nginx/sites-enabled/
sudo nginx -t
sudo systemctl reload nginx
Deploy Application to Tomcat
Stop Tomcat temporarily
sudo systemctl stop tomcat
Remove default Tomcat applications (optional)
sudo rm -rf /opt/tomcat/tomcat9/webapps/ROOT*
sudo rm -rf /opt/tomcat/tomcat9/webapps/docs*
sudo rm -rf /opt/tomcat/tomcat9/webapps/examples*
sudo rm -rf /opt/tomcat/tomcat9/webapps/host-manager*
sudo rm -rf /opt/tomcat/tomcat9/webapps/manager*
Deploy your application WAR files
Copy your service.zip files to the webapps directory:
sudo cp service.zip /opt/tomcat/tomcat9/webapps/
cd /opt/tomcat/tomcat9/webapps
unzip service.zip
systemctl restart tomcat
Set proper permissions
sudo chown -R tomcat:tomcat /opt/tomcat/tomcat9/webapps/
Start Tomcat
sudo systemctl start tomcat
Deployment of UI build (ex-dashboard)
Create the directory:
mkdir -p /var/www/html/dashboard/
Deploy the UI code via GitHub/Putty
Deploy the UI code to the dashboard directory using GitHub or Putty.
Setup the DHIS HOME
1) Create dhis_config directory
sudo mkdir /opt/dhis_config
sudo chown tomcat:tomcat /opt/dhis_config
chmod -R 755 /opt/dhis_config
Create dhis.conf file to the directory
vi /opt/dhis_config/dhis.conf
sudo chown tomcat:tomcat /opt/dhis_config/dhis.conf

connection.dialect = org.hibernate.dialect.PostgreSQLDialect
connection.driver_class = org.postgresql.Driver
connection.url = jdbc:postgresql://localhost:5432/{replace your DB name}
connection.username = {replace_your_db_username}
connection.password = {replace_your_db_password}

dure.email.config=smtp
dure.email.sendgridkey = {replace_your_sendgrid_key}

dure.smtp.port = {replace_your_smtp_port}
dure.smtp.server = {replace_your_smtp_server}
dure.smtp.username = {replace_your_smtp_username}
dure.smtp.password = {replace_your_smtp_password}

dure.url.config=true

dure.url.config.excelpath=/replace_your_path/excelupload/
dure.url.config.url=https://your-domain.com/excelupload/
dure.url.config.templatepath=/replace_your_path/exceldownload/
dure.url.config.templateurl=https://your-domain.com/exceldownload/
dure.url.config.exportpath=/replace_your_path/excelexport/
dure.url.config.exporturl=https://your-domain.com/excelexport/
Note:
- If
dure.url.config=true, the application will pick up the above path properties from this dhis.conf file. - If
dure.url.config=false, the application will pick up the path properties from the database.
For Example:
dure.email.config=smtp
dure.email.sendgridkey=sgkey

dure.smtp.port=443
dure.smtp.server=cdic.imonitorplus.com
dure.smtp.username=username
dure.smtp.password=password

dure.url.config = true

dure.url.config.excelpath = /home/stagingcdicusr/public_html/excelupload/
dure.url.config.url = https://stagingcdic.imonitorplus.com/excelupload/
dure.url.config.templatepath = /home/stagingcdicusr/public_html/exceldownload/
dure.url.config.templateurl = https://stagingcdic.imonitorplus.com/exceldownload/
dure.url.config.exportpath = /home/stagingcdicusr/public_html/excelexport/
dure.url.config.exporturl = https://stagingcdic.imonitorplus.com/excelexport/
Update the tomcat server.xml with the following:
<Connector port="8080"
           protocol="HTTP/1.1"
           connectionTimeout="20000"
           redirectPort="8443"
           URIEncoding="UTF-8"
           relaxedQueryChars="[]|{}^`\"
           relaxedPathChars="[]|{}^`\" />
Set DHIS2_HOME in Tomcat environment
sudo nano /opt/tomcat/tomcat9/bin/setenv.sh
2) Add the following content to setenv.sh:
export DHIS2_HOME=/opt/dhis_config
3) Make the script executable and restart Tomcat
sudo chmod +x /opt/tomcat/tomcat9/bin/setenv.sh
sudo systemctl restart tomcat
Firewall Configuration
Enable firewall (if not already enabled)
sudo ufw enable
or
sudo systemctl enable firewalld
sudo systemctl start firewalld
Open necessary ports
For ufw (Ubuntu):
sudo ufw allow 80/tcp
sudo ufw allow 443/tcp
sudo ufw allow 22/tcp
Or for firewalld (CentOS/RHEL):
sudo firewall-cmd --permanent --add-port=80/tcp
sudo firewall-cmd --permanent --add-port=443/tcp
sudo firewall-cmd --permanent --add-port=22/tcp
sudo firewall-cmd --reload
Verify Installation
- Check Tomcat:
sudo systemctl status tomcat - Check PostgreSQL:
sudo systemctl status postgresql - Check Nginx:
sudo systemctl status nginx - Test application access in browser:
http://your-server-ip/service/ - Check Tomcat logs:
tail -f /opt/tomcat/tomcat9/logs/catalina.out
Smart Setup
CDIC T1D Registry Smart Setup Application
This document describes the setup, configuration, and deployment steps for the CDIC Smartsetup Application (React-based).
Prerequisites
- Node.js v16 or above (Recomended: 16.16.0, 16.20.0, 16.20.2)
- npm (comes with Node.js)
- Backend Server URL
- Access to deployment server
Server Configuration
File Location: src/config/appConfig.js
export const appBaseUrl = "https://YOUR_SERVER_URL/";
export const appApiUrl = "https://YOUR_SERVER_URL/service/api/";
export const basicAuthToken = "YOUR_BASIC_AUTH_KEY";
Ensure the API URL points to the DHIS deployed service path (/service/api/).
Replace YOUR_BASIC_AUTH_KEY with your own Base64-encoded key during development and testing.
How to Generate Base64 Auth
JavaScript
const username = "admin";
const password = "Test@123";
const auth = "Basic " + btoa(username + ":" + password);
console.log(auth);
// Copy the auth value from console and use it as Authorization header
Java
String username = "admin";
String password = "Test@123";
String auth = "Basic " + Base64.getEncoder().encodeToString((username + ":" + password).getBytes());
System.out.println(auth);
// Copy the auth value from console and use it as Authorization header
Deployment Folder Configuration
Default Deployment Folder: smartsetupv2
Deployment URL Example: https://YOUR_SERVER_URL/smartsetupv2
Changing Deployment Folder Name (basename)
File Location: src/App.js
<BrowserRouter basename="/smartsetupv2">
Example if folder name is changed to smartsetup:
<BrowserRouter basename="/smartsetup">
Important: Folder name and basename must always match.
Install and Run Application
Install dependencies:
npm install --legacy-peer-deps
Run application:
npm start
Deployment Steps (Server)
- Generate build:
npm run build - Create deployment folder on server: Create a folder named
smartsetupv2(or as per basename). - Copy build files: Copy the build ZIP file into the smartsetupv2 folder.
- Extract build files: Extract the ZIP contents inside the smartsetupv2 folder.
- Verify deployment URL: https://YOUR_SERVER_URL/smartsetupv2
Final Deployment Checklist
appConfig.jsupdated with correct server URLs- DHIS service API path verified
basenamematches deployment folder- Production build deployed successfully
- Application accessible at correct URL
Email Configuration
Email Configuration – Technical Documentation (DHIS2)
1. Overview
This document describes the custom email configuration setup implemented in DHIS2 under the DURE custom module.
The solution supports SendGrid as the primary email provider and SMTP as a fallback or optional provider. All configurations are externalized using DHIS2 configuration files.
2. Configuration Location
All email-related configurations are defined in the DHIS2 external configuration file:
dhis.conf(or environment-specific equivalents)
3. Configuration Properties
3.1 Email Provider Selection
- Property:
dure.email.config - Values:
sendgridorsmtp - Purpose: Determines which email provider implementation to use.
3.2 SendGrid Configuration
- Property:
dure.email.sendgridkey - Value:
key(API key placeholder) - Purpose: API key used to authenticate with SendGrid.
3.3 SMTP Configuration (Optional)
Used when SMTP is selected as the email provider. Properties:
dure.smtp.port— Example:443dure.smtp.server— Example:stagingcdic.imonitorplus.comdure.smtp.username— Example:usernamedure.smtp.password— Example:password
Purpose: Used when SMTP is selected as the email provider.
4. Code-Level Implementation
4.1 Configuration Access Layer
A dedicated service (DureConfigService) is used to read custom properties using DhisConfigurationProvider.
4.2 Email Service Design
- EmailService interface with SendGrid and SMTP implementations.
- The provider is selected dynamically using configuration.
5. Security Considerations
- Credentials stored only in
dhis.conf - No hardcoded secrets
- Environment-specific configurations supported
Admin Module
T1D Registry-Admin Module Application
This document describes the setup, configuration, and deployment steps for the T1D Registry Admin Dashboard Application (React-based).
Prerequisites
- Node.js v16 or above (Recomended: 16.16.0, 16.20.0, 16.20.2)
- npm (comes with Node.js)
- Backend Server URL
- Access to deployment server
Server Configuration
File Location: src/config/appConfig.js
export const appBaseUrl = "https://YOUR SERVER URL/";
export const appApiUrl = "https://YOUR SERVER URL/service/api/";
export const adminAccountEmail = "YOUR_ADMIN_ACCOUNT_EMAIL";
export const adminAccountPassword = "YOUR_ADMIN_ACCOUNT_PASSWORD";
Ensure the API URL points to the DHIS deployed service path (/service/api/).
For adminAccountEmail & adminAccountPassword use the same admin account credentials you used to create the program.
Deployment Folder Configuration
Default Deployment Folder:
cdicdashboardv2
Deployment URL Example:
https://YOUR SERVER URL/cdicdashboardv2
Changing Deployment Folder Name (basename)
File Location: src/App.js
<BrowserRouter basename="/cdicdashboardv2">
Example if folder name is changed to admin:
<BrowserRouter basename="/admin">
Folder name and basename must always match.
Install and Run Application
Install dependencies:
npm install --legacy-peer-deps
Run application:
npm start
Deployment Steps
- Generate build
npm run build - Create deployment folder on server
Create a folder named cdicdashboardv2 (or as per basename). - Copy build files
Copy the build ZIP file into the cdicdashboardv2 folder. - Extract build files
Extract the ZIP contents inside the cdicdashboardv2 folder. - Verify deployment URL
https://YOUR SERVER URL/cdicdashboardv2
Final Deployment Checklist
- appConfig.js updated with correct server URLs
- DHIS service API path verified
- basename matches deployment folder
- Production build deployed successfully
- Application accessible at correct URL
T1D Registry
CDIC T1D Registry Web Application
This document describes the setup, configuration, and deployment steps for the CDIC T1D Registry Web Application.
Prerequisites
- Node.js v16 or above (Recomended: 16.16.0, 16.20.0, 16.20.2)
- npm
- Google Maps API Key
- Backend Server URL
- Access to deployment server
Runtime Configuration
File Location: public/runtime-config.json
{
  "basename": "cdicv2",
  "baseUrl": "https://YOUR_BASE_URL/",
  "apiServiceKey": "https://YOUR_BASE_URL/service/api/",
  "apiSurveyKey": "https://YOUR_BASE_URL/service/",
  "googleMapAPIKey": "YOUR_GOOGLE_MAPS_API_KEY",
  "basicAuth": "YOUR_BASIC_AUTH_KEY"
}
Ensure the API URL points to the DHIS deployed service path (/service/api/).
Replace YOUR_BASIC_AUTH_KEY with your own Base64-encoded key during development and testing.
Basic Authentication Configuration
Basic Authentication requires a Base64-encoded value derived from username and password. Use the below default credentials for reference:
- username: admin
- password: Test@123
Example Format (Placeholder Only)
Basic YOUR_BASIC_AUTH_KEY
▲ The above value is a placeholder and does NOT represent real credentials.
How to Generate Base64 Auth
JavaScript:
const username = "admin";
const password = "Test@123";
const auth = "Basic " + btoa(username + ":" + password);
Java:
String username = "admin";
String password = "Test@123";
String auth = "Basic " + Base64.getEncoder()
.encodeToString((username + ":" + password).getBytes());
Online Base64 Converter (Optional)
For quick testing, you may use an online Base64 encoder for basic auth key:
https://mixedanalytics.com/tools/basic-authentication-generator/
Using above online tool you can convert credentials to base 64. Enter your username and password, using the format username:password
▲ Do NOT use online tools with real production credentials.
Deployment Folder (basename)
The basename represents the deployment folder name on the server. If the application is deployed under https://yourserverurl/cdicv2, then the basename value must be set to cdicv2.
Media Folder Setup (Mandatory)
Create a media folder on the server at the following location: https://YOUR_SERVER_URL/media
Required files inside media folder:
logo.pnglandingpage.png
Ensure both files are publicly accessible and used for the onboarding page UI.
Content Security Policy (CSP) Update
File Location: public/index.html
Add your server URL inside the connect-src directive of the Content-Security-Policy meta tag. Ensure the following entry is present in connect-src: https://YOUR_SERVER_URL
Authentication Handling
Localhost / Development:
- Uses Authorization header (token-based authentication)
Steps to deploy on a server:
- Uses JSESSIONID cookie-based authentication
- Authorization header must be removed or commented
Install and Run Application
Install dependencies:
npm install --legacy-peer-deps
Run application:
npm start
Deployment Steps
Deployment Steps
- Generate Build: Run the following command in the project root:
npm run build - Create Deployment Folder on Server: Create a folder on the server named
cdicv2(or the value defined in basename). - Copy Build Files: Copy the generated build ZIP file into the
cdicv2(basename) folder. - Extract Build Files: Extract the ZIP file content inside the
cdicv2folder. - Verify Deployment URL: Ensure the application is accessible at: https://YOUR_SERVER_URL/cdicv2
Deployment Checklist
runtime-config.jsonupdatedbasenamematches deployment folder- Google Maps API key configured
- Media folder created with required images
- CSP
connect-srcupdated with server URL - Authorization enabled only for localhost
- Build deployed successfully
Smart Setup Guide
Smart Setup Configuration Guide
Introduction
The Smart Setup module allows administrators to configure and customize their community, registration forms, program structure, stages, and user roles. This guide provides a step-by-step walkthrough to help you successfully set up and publish your community.
Important Note: Any changes made during Smart Setup will not be visible to users until the configuration is published at the end of the setup process.
Section 1: Community Registration and Initial Login
Steps to Register and Activate a Community
-
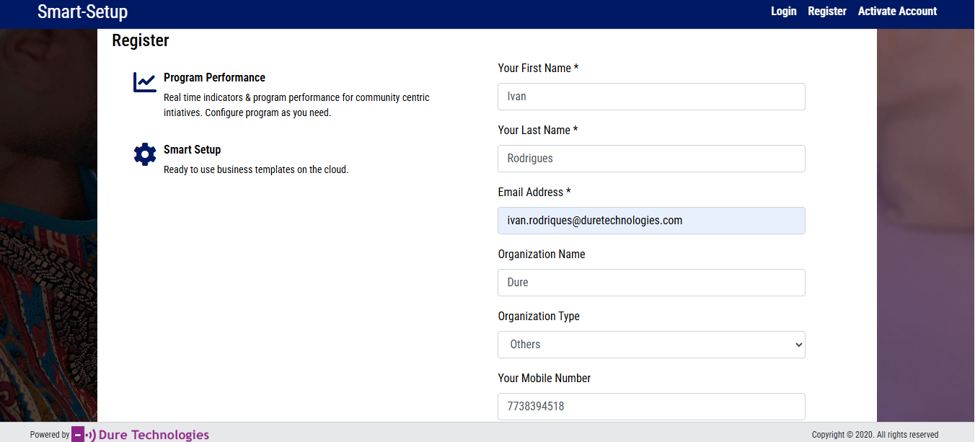
Register a New Community
- Navigate to the platform homepage.
- Locate and click the Register button positioned in the top-right corner of the screen.
-
Enter Registration Information
- Complete all required registration fields.
- Verify that the information entered is accurate.
- Click Submit to proceed.
-
Save the Generated Token
- Upon successful registration, a unique Token will be generated.
- Make a note of this token and store it securely.
- The token will be required during the community activation process.
-
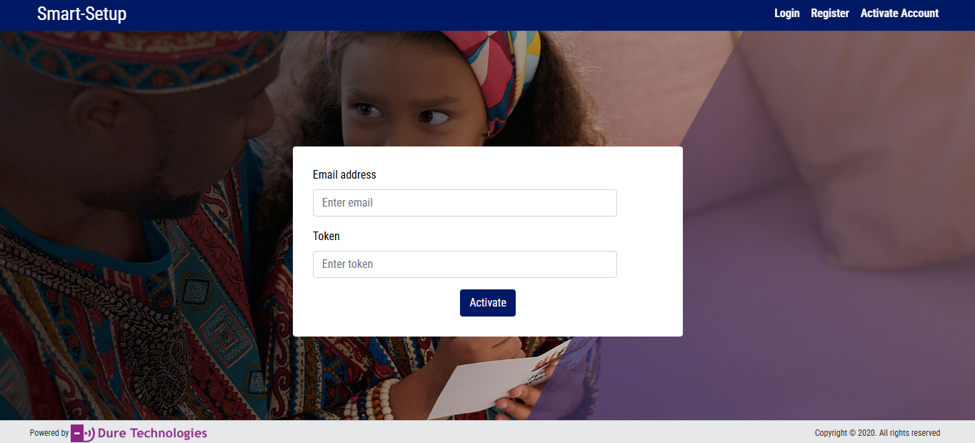
Activate the Community
- Enter the registered email address.
- Enter the generated token.
- Submit the information to complete the community creation process.
-
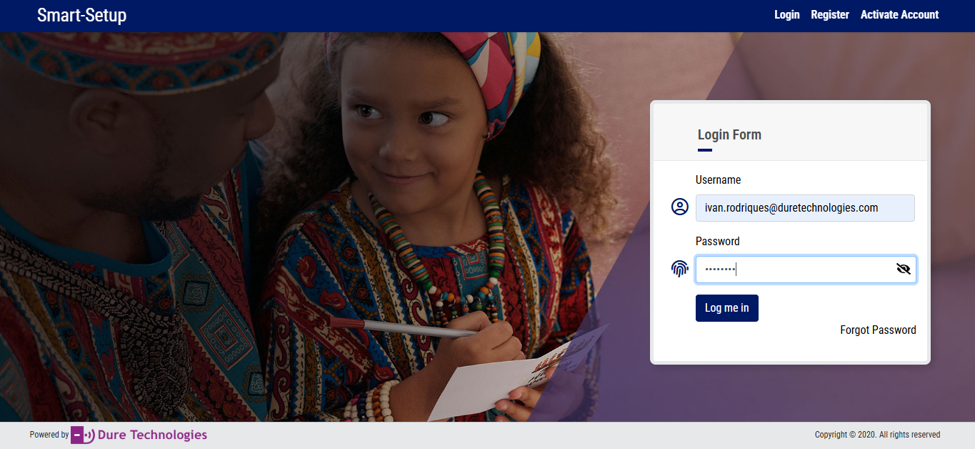
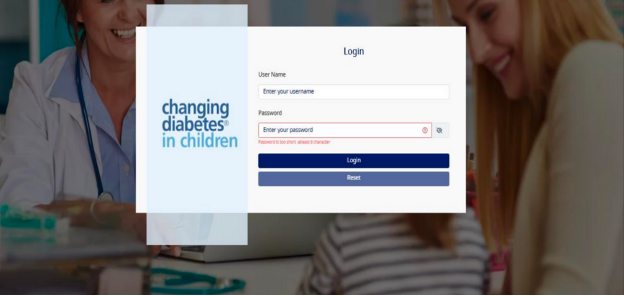
Log Into the Platform
- Enter the email address used during registration.
- Enter the password selected during community creation.
- Click Login.
-
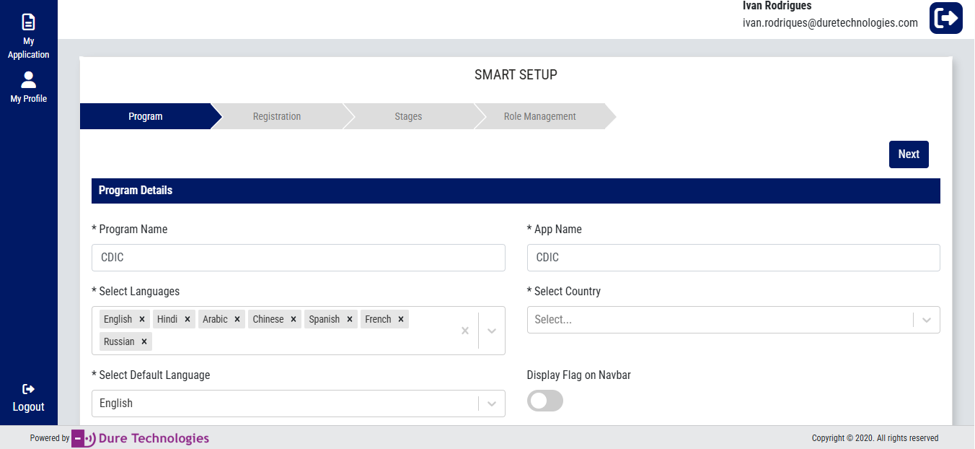
Select Country
- Choose the country associated with your community.
- Click Next to proceed to the Smart Setup dashboard.
Note: Configuration changes made during Smart Setup are stored as drafts and will only become active after publishing.
Section 2: Program Configuration
The Program section allows administrators to define the overall structure and branding of their community.
Step 7: Configure Program Details
-
Update Program Name
- Navigate to the Program section.
- Locate the Program Name field.
- Enter the desired program name.
-
Update Application Name
- Locate the Application Name field.
- Enter the name that should be displayed throughout the platform.
-
Configure Languages
- Select the languages that should be available to end users.
- Choose a Default Language from the selected language options.
- Save the configuration.
Section 3: Registration Form Configuration
The Registration section allows administrators to build and customize registration forms that users will complete when enrolling in the program.
Step 8: Configure Registration Questions and Sections
-
Create a New Section
- Navigate to the Registration module.
- Click Add & Configure Section.
- Enter the section name (e.g. Personal Information, Contact Information, Medical History, Demographics).
- Save the section.
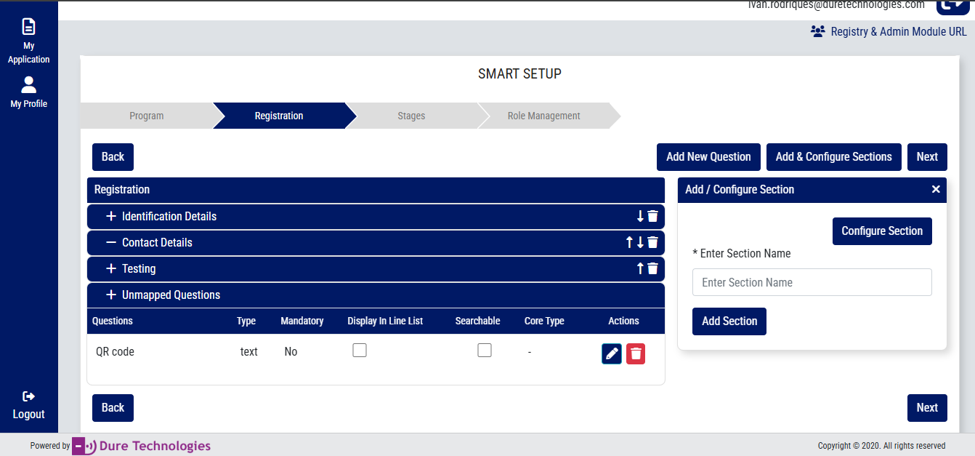
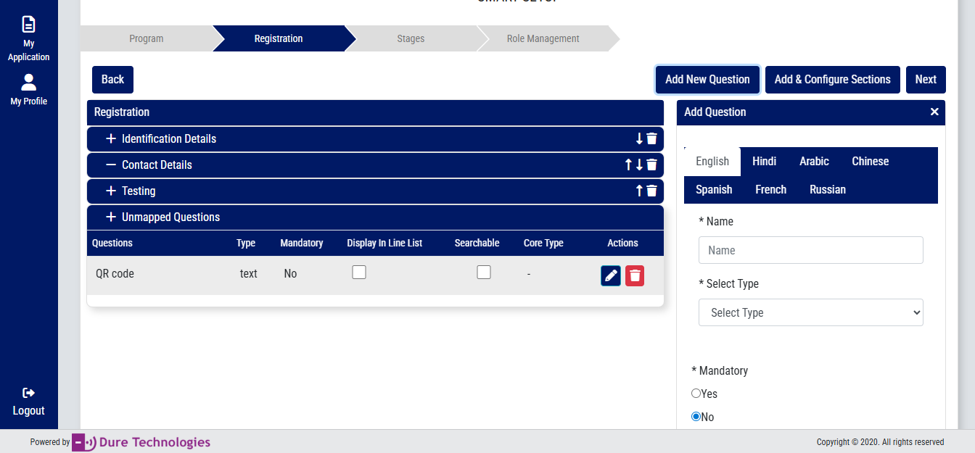
-
Add New Questions
- Click Add New Question.
- Enter the question text.
- Select the appropriate data type (e.g. Text Field, Number, Date, Single Select, Multi Select, Checkbox, Dropdown).
- Configure whether the question should be mandatory.
- Save the question.
-
Manage Unmapped Questions
- Newly created questions will initially appear under the Unmapped section. Publish or update the program first to map them to a particular section.
- After publishing or updating the program, drag, move, or assign questions to the desired section.
-
Reorder Sections and Questions
- Use the Up Arrow to move an item higher.
- Use the Down Arrow to move an item lower.
- Arrange sections and questions in the desired order.
-
Edit Existing Questions
- Click the Pencil (Edit) icon.
- Modify the Question Text, Data Type, Mandatory Status, or Available Options as needed.
- Save the changes.
-
Delete Questions
- Click the Delete icon next to the question.
- Confirm deletion when prompted.
Note: Deleted questions may impact previously collected data. Exercise caution before removing existing questions.
Section 4: Program Stage Configuration
Stages represent different phases of the program journey and help organize data collection and workflows.
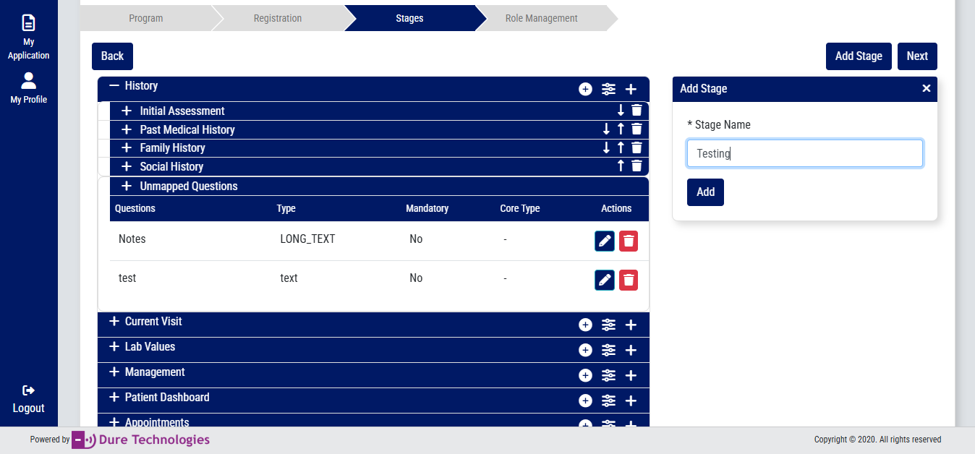
Step 9: Configure Program Stages
-
Create a New Stage
- Navigate to the Stages section.
- Click Add Stage.
- Enter a stage name (e.g. Enrollment, Screening, Diagnosis, Treatment, Follow-up).
- Save the stage.
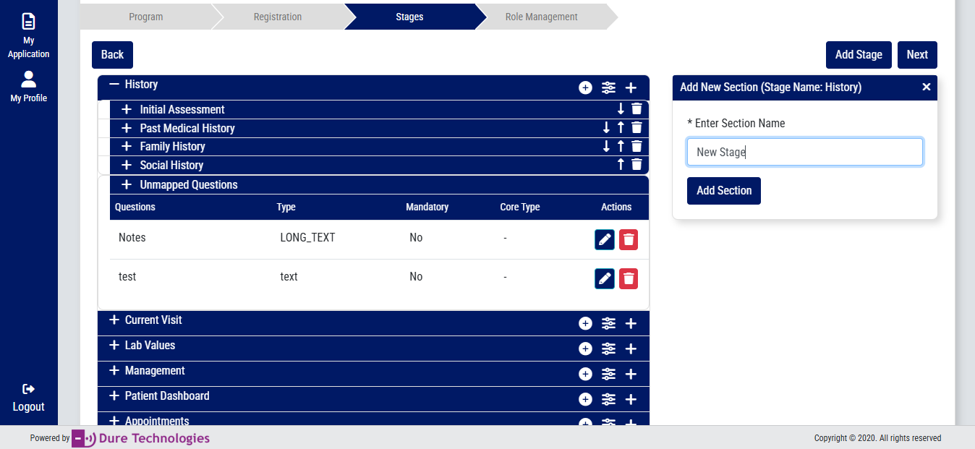
-
Add Sections Within a Stage
- Locate the desired stage.
- Click the + button associated with the stage.
- Select Add Section.
- Enter the section name (e.g. Clinical Assessment, Laboratory Results, Treatment Information).
- Save the section.
-
Configure Questions Within Sections
- Click Configure on the desired section.
- Select the questions that should appear within that section.
- Save the configuration.

-
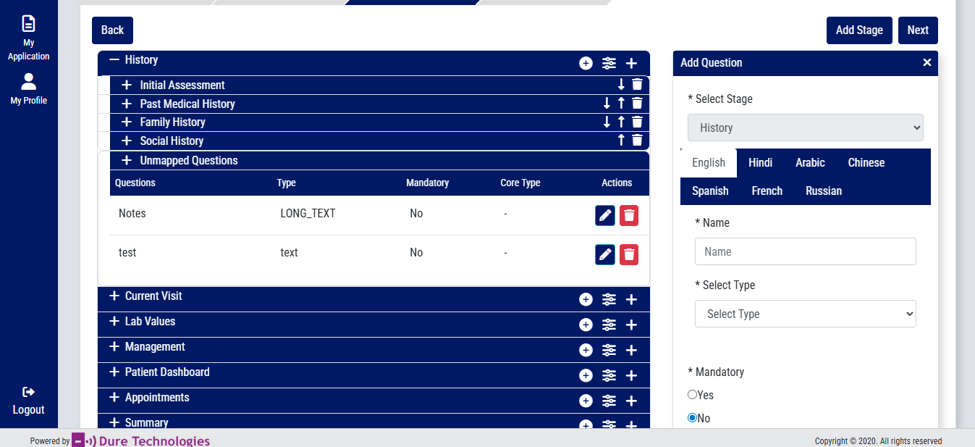
Add New Questions to a Stage
- Click the + button within the stage.
- Select Add Question.
- Enter the question details and save.
- Newly created questions will appear in the Unmapped section until assigned. Publish or update the program first to assign them to a particular section.
-
Assign Questions to Sections
- Locate the question under Unmapped Questions.
- Assign it to the appropriate section.
- Save the changes.
-
Reorder Stage Content
- Use the Up Arrow to move content upward.
- Use the Down Arrow to move content downward.
- This functionality applies to Stages, Sections, and Questions.
-
Edit Existing Questions
- Click the Pencil (Edit) icon.
- Update the Question Text, Data Type, Validation Rules, or Mandatory Status as needed.
- Save changes.
-
Delete Questions
- Click the Delete icon.
- Confirm the deletion. The question will be removed from the stage configuration.
Section 5: Role Management
Role Management controls user access and permissions throughout the platform.
Steps to Configure Roles
-
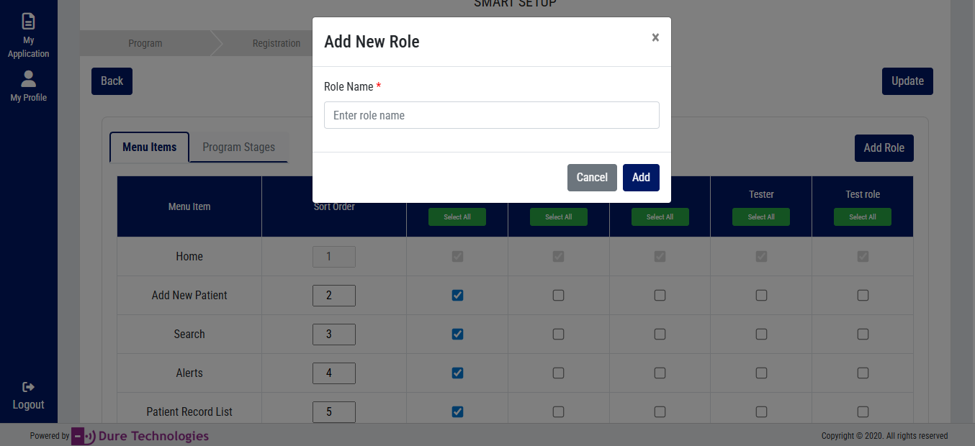
Create a New Role
- Navigate to the Role Management section.
- Click Add Role.
- Enter the role name (e.g. Administrator, Program Manager, Data Entry Operator, Clinician, Reviewer).
- Save the role.
Examples: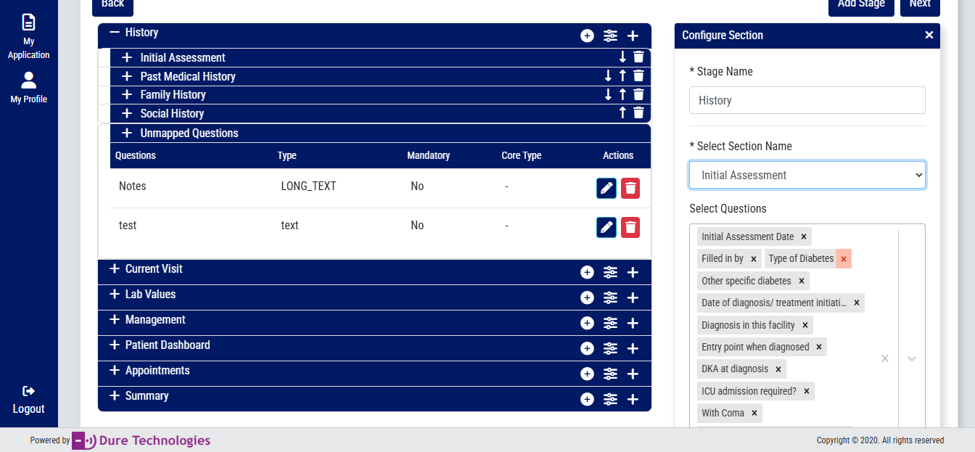
- Administrator
- Program Manager
- Data Entry Operator
- Clinician
- Reviewer
-
Configure Module Access
- Select the role you wish to configure.
- Review the list of available modules and sections.
- Use the checkboxes to grant or restrict access (e.g. Dashboard Access, Registration Forms, Program Stages).
- Save the configuration.
- Dashboard Access
- Registration Forms
- Program Stages
-
Assign Program Stages to Roles
- Open the Program Stages menu.
- Select the stage(s) that should be accessible to the role.
- Check the corresponding boxes.
- Save the permissions.
This ensures users only access the stages relevant to their responsibilities.
Section 6: Publish Configuration
After completing all setup activities, follow these steps to publish your configuration:
- Review all configurations.
-
Verify the following before publishing:
- Program settings
- Registration questions
- Stage configuration
- Role permissions
- Click Publish.
Once published:
- All configured changes become active.
- Users will see the updated structure.
- Registration forms and workflows will reflect the latest setup.
Best Practices
- Plan program stages before configuration.
- Use meaningful section and question names.
- Keep registration forms concise and relevant.
- Assign permissions based on actual user responsibilities.
- Test all configurations before publishing.
- Review multilingual content for accuracy before making it available to users.
By following this guide, administrators can efficiently configure and manage a fully customized community using the Smart Setup module.
Admin Guide
User Creation
The purpose of this document is to list steps on how to create system users.
In the steps we can give how to create a healthworker user
Steps:
Use the credentials created via Smart Setup.
Steps to create a user
- Login to the admin module: -
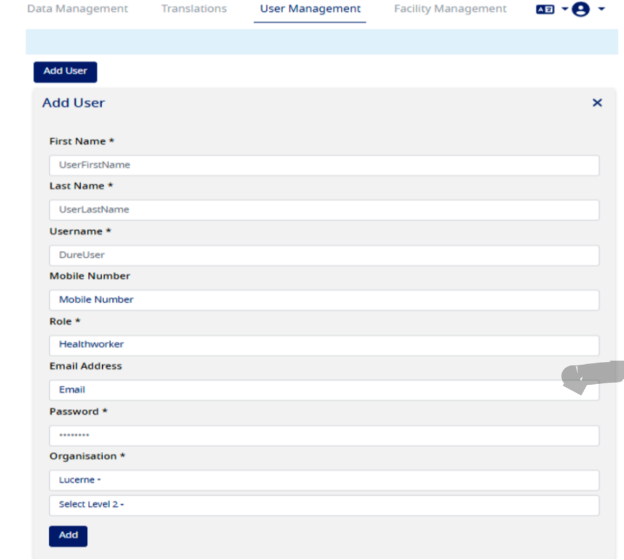
- Navigate to the menu "User Management", click on the button "Add User" as per the screen shot below:-
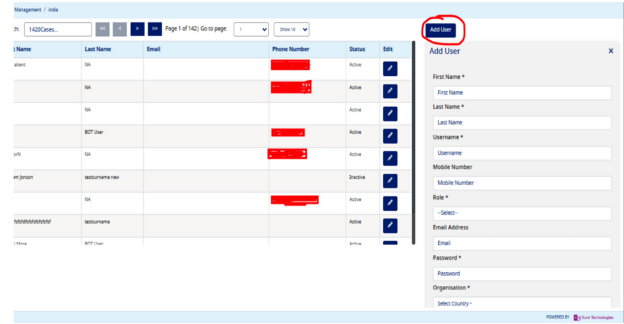
- Enter the details in mandatory field like First Name, Last Name, Username
- To create a user to access Type 1 Diabetes Registry Application, select the role as "HealthWorker"
- Enter a temporary password
- Select Organization as per your requirement
- Click on the "Add" button to create a user, see the screen shot below, please copy the username and password so that it can be shared with the user. -
- If the user gets successfully created, you will get a success message as below:-
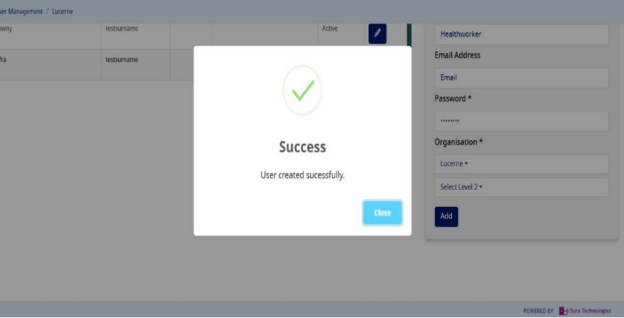
- Once the user is created as per the role, please share the username/password with the user for whom you have created these credentials
- When the Type 1 Diabetes Registry user logs in to the Type 1 Diabetes Registry with the provided temporary credentials he/she will be asked to reset the password as shown in the screen shot below:-
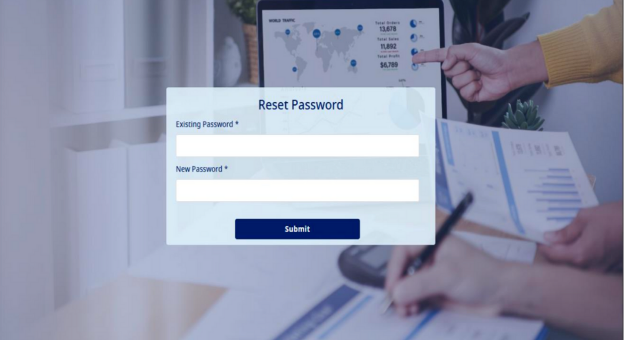
- The user will have to enter the password in the "Existing Password" field provided by the admin and add a new password in the "New Password" field and click on "Submit" button. This will help the user to change the password from the one initially provided by the admin
- User will be shown a "Password Changed!" success message as shown in the screenshot below:-
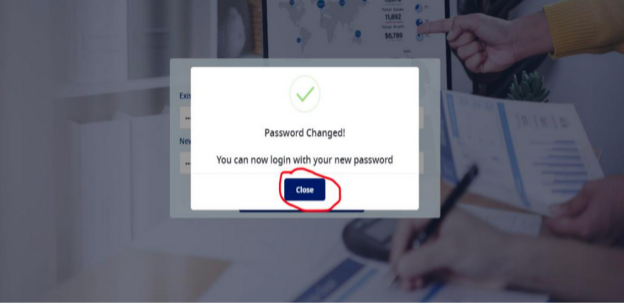
- Next user needs to click on the "Close" button as marked in the screen shot above. On the click of this button, the user will be redirected to the login page again, as shown below:
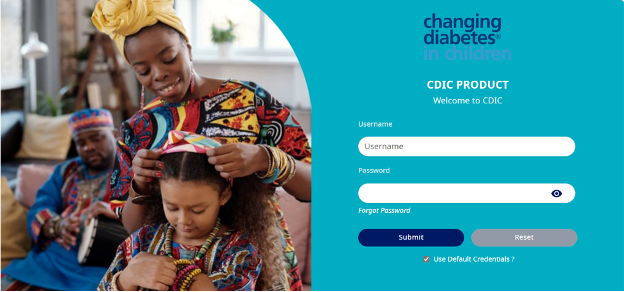
- User will then have to login to the Type 1 Diabetes Registry with the username and the new password.
- On successful login, the user will see the landing page of the application
Organization & Facility Creation Manual V1.0
Introduction
Purpose The purpose of this document is to list steps on how to create an organization unit and facility
Org Unit Creation Steps
- Login to the admin module with the provided link
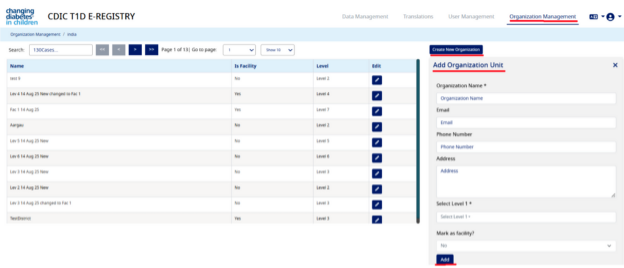
- Navigate to the "Organization Management" and click on "Create New Organization",
- Under "Add Organization" section, enter "Organization Name" (e.g. Pune)(this is the name of the organization under which you want to create a facility), Email, Phone Number, Address,
- Then under “Organization Parent” select Level 1. At “Mark as facility” select “No” and click on “Add” button. This will create an organization successfully.
- The “Organization Name” that you have added will now be created under the above hierarchy (e.g. Level 1). please see the screen shot below, explained with above example:
Facility Creation Steps
- Navigate to "Organization Management" within the application and click on "Create New Organization".
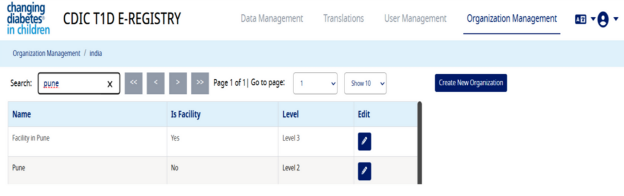
- Under “Add Organization” section, (for now we have added a generic label as Organization Name) enter “Facility Name” (e.g. Facility in Pune) (this is the name of the facility which will be created under a leve
- Then under “Organization Parent” select Level 1, then Level 2 (existing organization/facility)
- Then under “Mark as facility” select “Yes” and click on “Add” button. This will create a facility successfully
- You will get a pop-up saying organization created successfully (for now we have added a generic message). In our e.g. the above process will create a hierarchy as below:
-
Level 1 (Country)
-
Level 2 (Pune)
- Level 3 (Facility in Pune)
- … (There is no limit to add levels)
-
Level 2 (Pune)
Please see the screen shot below:

-
Level 1 (Country)
- You can search the newly created organization and facility in the list as shown below:-
Data Upload
Steps to Upload Data
- Log in to the Admin Module
- Navigate to Data Management > Data Upload.
- Click on Download Template.
- Fill in the data in the downloaded template, ensuring all prerequisites are met.
- On the Data Upload page, click Choose file.
- Select the completed template and click Open.
- Click on Upload and wait a few minutes for the process to complete smoothly.
- Go to Data Upload Logs:
- Check the Upload Date and Time to confirm the file was uploaded.
- If no data has been uploaded, the Total Entries will display 0 as shown in below screenshot.
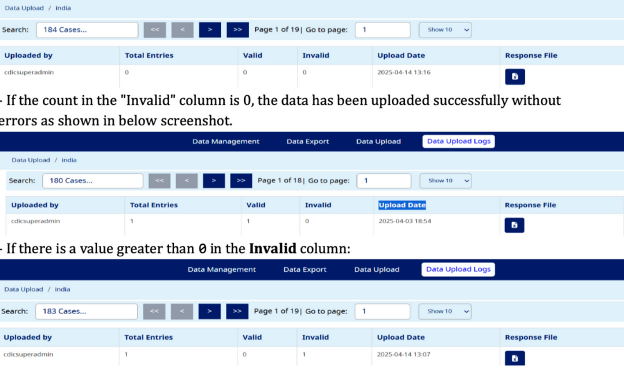
To Re-Upload Correct File
- Click on Response File for the respective record.
- Open the file, review the Error Sheet, and correct the errors by filling in appropriate data.
- Save the updated file and re-upload it.
Prerequisites Before Uploading the Data File -
- All mandatory fields must be filled.
- Under the Registration tab, both TEI ID and Org Unit must be completed.
- In all stages, the TEI ID must be selected from the dropdown for each row containing data.
- All date fields must follow the format YYYY-MM-DD.
- Fields such as first Name and Last Name should contain only alphabets—numbers and symbols are not allowed.
- Numeric fields (e.g., Phone Number) should contain only digits. Alphabets and symbols are not permitted.
- All numeric fields must have non-negative values and should adhere to the maximum value range specific to each field.
- Dropdown fields should only contain values selected from the dropdown menu—manual entries are not allowed.
- For dependent fields, corresponding pre-dependent fields must also be filled.
- Fields designated for file uploads should be left blank—no data should be entered in these fields.
In the Management section:
- Ensure the correct relationship between Name of the Insulin, Regimen Type, and Type of Insulin.
- Regimen Type and Type of Insulin are auto-filled based on the Name of the Insulin.
For Lab Tests and Radiology Tests under Management:
- Data should be manually entered exactly as it appears in the Master Data, with no spelling errors.
- Multiple visits can only be added for the Current Visit and Lab Values stages.
Translations Feature Documentation
Overview
The Translations Feature in the Type 1 Diabetes Registry Admin Module allows users to manage translations for form labels and app labels. This feature ensures that labels displayed in the Type 1 Diabetes Registry Web App are available in multiple languages, improving accessibility and usability for users across different regions.
Translations Tab Structure
The Translations tab consists of two sub-tabs:
- Form Labels
- App Labels
Form Labels
The Form Labels section allows users to manage translations for all the Form elements like input field labels/names, dropdown select options, radio button options and checkbox options used throughout the Type 1 Diabetes Registry Web App. This ensures consistency in field labels/names across different languages. The available options in this section are:
a) Download Template:
The Download Template option enables users to download an Excel file containing all names that require translation for the selected programID.
The Excel file consists of three separate sheets for:
- TrackedEntityAttribute Names
- DataElement Names
- Options Names
- Each of these names is mapped to a unique identifier (UID) listed in the first column of the sheet
- The second column contains the default label names
- The subsequent columns represent different languages, with language codes as column headers (e.g., en for English).
- Users can enter translations for each label in the corresponding language columns.
b) Upload Translations:
The Upload Translations option allows users to upload the updated Excel sheet containing translations
The system processes the uploaded file and updates the translations in the Type 1 Diabetes Registry Web App.
- Once uploaded successfully, the new translations will be reflected in the application Ul, ensuring multilingual support for users.
App Labels
The App Labels section allows users to manage translations for static text elements used throughout the Type 1 Diabetes Registry Web App. This ensures consistency in Ul text across different languages. The available options in this section are:
a) Download Template:
- The Download Template option enables users to download an Excel file containing all existing App Labels for which translations exist.
- First column contains all existing App Labels.
- The subsequent columns represent different languages, with language codes as column headers (e.g., en for English).
- The subsequent columns represent different languages, with language codes as column headers (e.g., en for English).
- Users can add new labels in the Labels column and enter translations in the language columns, similar to Form Labels.
- The label should be exact same as seen on UI, as all labels are case sensitive.
Upload Translations:
- The Upload Translations option allows users to upload the updated Excel sheet containing translations for App Labels.
- The system processes the uploaded file and updates the translations in the Type 1 Diabetes Registry Web App.
- Once uploaded successfully, the new translations will be reflected in the application UI.
Functional Flow
- Downloading the Template:
- Navigate to Admin Module > Translations > Form Labels/App Labels
- Click Download Template to download an Excel file containing all labels related to the program
- Updating Translations:
- Open the downloaded Excel file.
- Locate the label requiring translation.
- Enter the translated text in the appropriate language column.
- Save the file
- Uploading Translations:
- Navigate to Admin Module > Translations > Form Labels/App Labels.
- Click Upload Translations.
- Select the updated Excel file and upload it.
- The translations will be processed and applied to the Type 1 Diabetes Registry Web App.
- Note: If no translation is added in any one of the languages for a specific label, the same label will be copied as translation into that language column.
Error Handling & Validation
- The uploaded Excel file must follow the exact template structure.
- For Form Labels only: Invalid or missing UIDs will result in errors during upload.
- Language columns must adhere to standard language codes (e.g., en, fr, es).
- If errors occur during upload, the system will provide feedback indicating the issue.
Expected Outcome
- Once translations are uploaded successfully, all labels in the Type 1 Diabetes Registry Web App will be displayed in the selected languages based on user preference.
Conclusion
The Translations Feature in the Type 1 Diabetes Registry Admin Module simplifies multilingual label management by providing an easy-to-use template for bulk updates. This enhances the accessibility and usability of the application for diverse user groups.
Provider Guide
Introduction
This manual is designed for healthcare professionals who will be granted authorized access to the application for patient data entry in the e-Registry. The authorized personnel will have access to the Notification form to onboard the patient into the system and capture their treatment progress and outcomes as per the treatment protocol set by the physician. They will also be provided with access to the Annual form which is designed to capture annual updates and review of the treatment journey once a year, from the date of their onboarding.
Getting Started
Welcome aboard the T1D e-Registry! Getting started is easy and we have laid out some guidelines to support you through the process. Should you require any additional information or resources, the Appendix section has a repository at your disposal that can enhance your experience of navigating the application.
To get started, you must paste the application link into your preferred web browser (Google Chrome, Microsoft Edge or Safari). Once you have accessed the application page, enter your secure, authorized credentials into the appropriate fields (Fig 1). Please note that the default credentials that automatically populate are test credentials and SHOULD NOT be used to capture patient data.
Application Link
Application link: https://cdicuat.imonitorplus.com/cdicv6/
Post authorization, the application will display a progress bar as it syncs data and sets up for your use. Once the process is completed (usually takes a second or two) you will be redirected to your homepage which acts as a control center for you to carry out your tasks in the unit. (Fig 2)


Understanding User Interface
The homepage is designed to allow you to seamlessly navigate through the two form types and search for your patients with ease. Let's delve into the sections that you will be using most frequently and explore the capabilities of each. To start with, let's take a look at the options available on the header of the application.
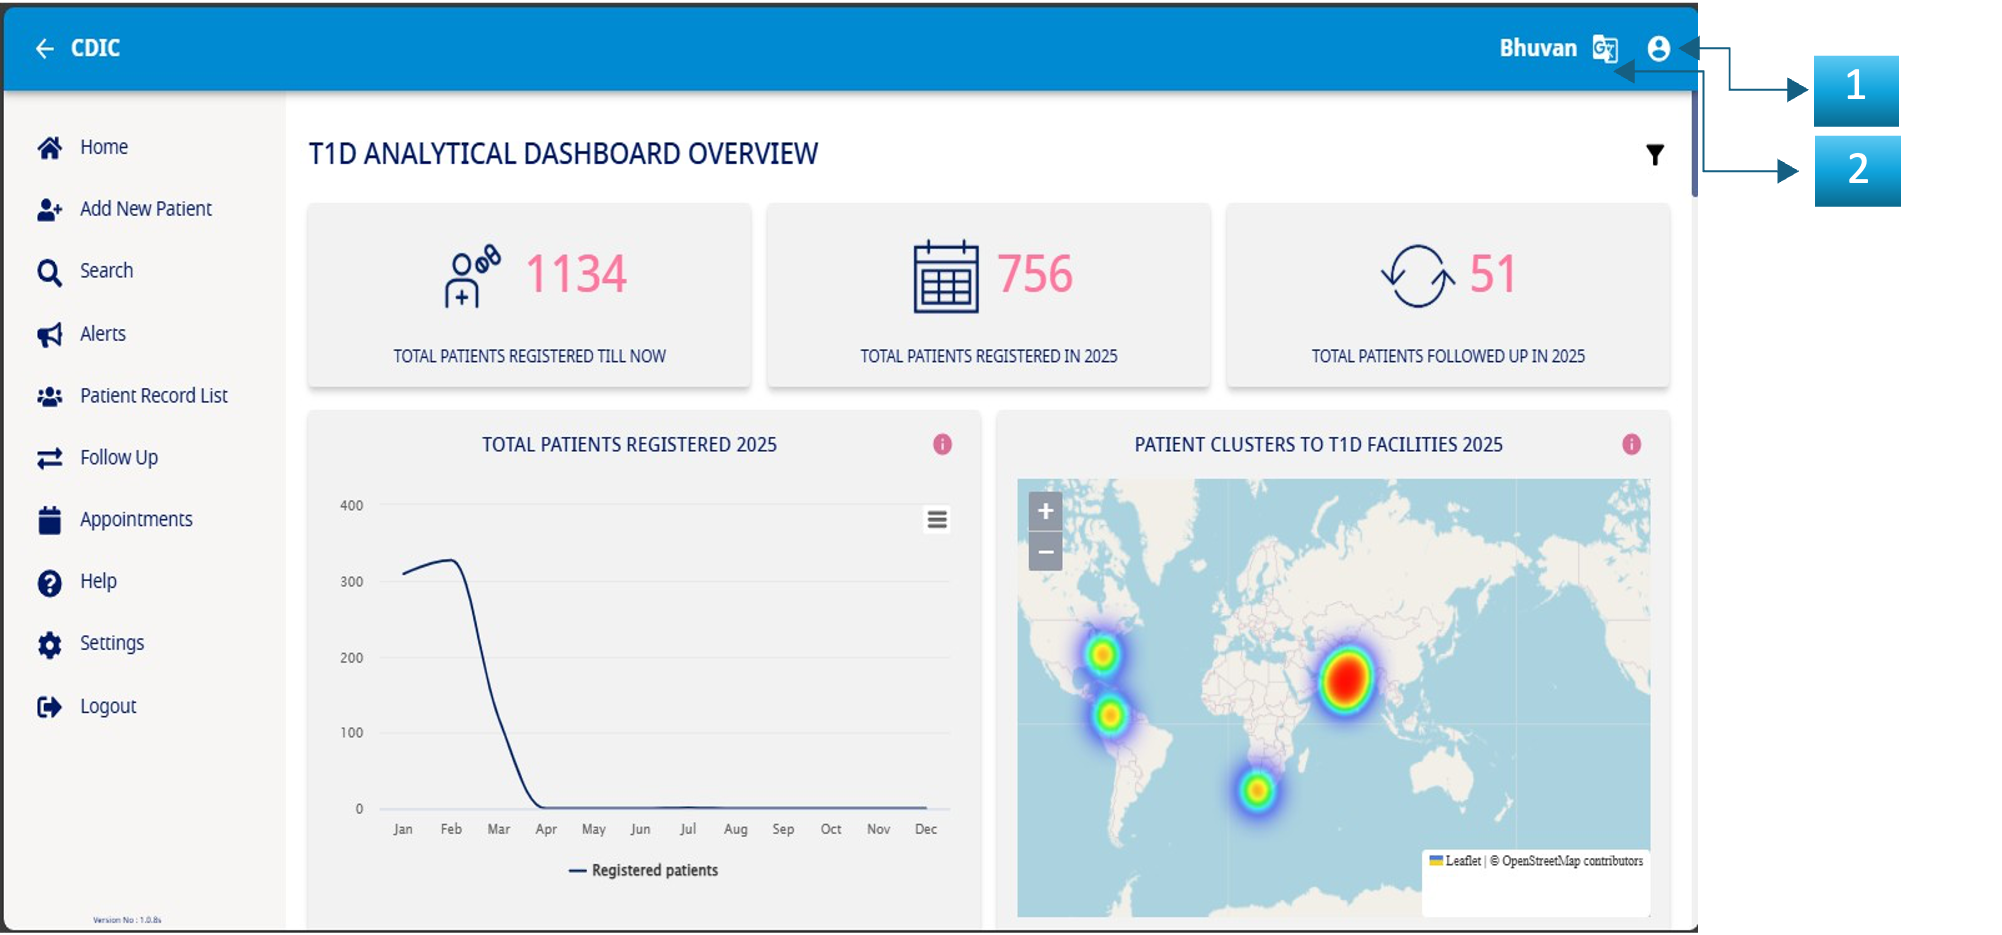
The image above of the homepage has three icons marked out in blue which allow you to carry out the following actions:
- The Homepage
- Language change – Should you wish to change the language at any given point, select the preferred option from the dropdown list and the system will reflect the change.
- Profile Options –
- a. Setting – Resetting the password.
- b. Logout – When you have completed the data entry for the day and want to close your session, click on the logout icon at the top right corner of the header. You will be logged out.
Now let's take a look at some of the features that you will be using most often to capture the patient data and complete the entry in the Type 1 Diabetes Registry e-Registry.
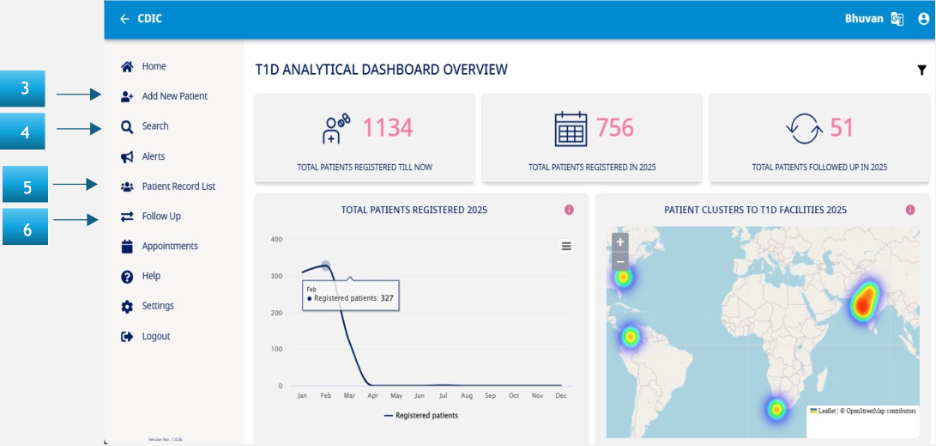
Navigation Menu
- Add New Client – Click on this button in the side menu to onboard a new patient into the system. This follows the Notification form requirements and will be covered in detail in the succeeding sections.
- Search – This functionality allows you to quickly search for an onboarded patient via their unique information like Name or UID.
- Patient Record List – This functionality allows you to view the list of patients you have onboarded and quickly jump to edit or add new information as required. Further details are in the succeeding sections. Please note that this feature is also available as an option in the sidebar menu too.
- Follow Up – This feature is used to capture the details related to the Annual form and is used once a year (from the date of onboarding the patient in the system).
New Patient Data Entry
Add New Patient
This section is designed to onboard the patient and capture primary details related to the due course of treatment and can be accessed via "Add New Patient" option in the sidebar menu. In successive appointments, the updated details are captured in a "New Visit" allowing for continuity of the record. Let us delve into the various sections of this feature.
Add a New Patient and Search
- Click on "Add New Patient"
- This will open a search section of the application (see image below Fig 5)
- Confirm no duplicity of records by completing a search in the medical records database via
- a. Profile Page (parameters like Name, DOB)
- b. UID

Registration
This section is designed to capture data related to the identification of the patient and the contact details.
- Initiate the registration process by filling in details in various sections (example: demographic details)
- For fields like Date of Registration and Date of Birth, the calendar will pop-up and you can switch between years by clicking on the year at the top left corner of the pop-up box
- To choose between the months, use the '<' and '>' buttons on either side of the pop-up box
- Click on the desired date in the calendar when you have finished steps 2 & 3
- The selected date will be displayed in the field
- For fields like Gender, Region Type, Nationality, Religion, Race, Language and Ethnicity that have a dropdown, click on the field and the menu list will be displayed
- Click on the desired option and it will reflect in the field
- Once done, click on the 'Submit' button below to complete the registration stage (Fig 6: Submit registration details)
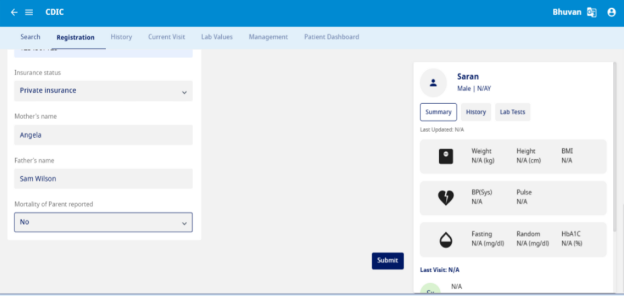
History
This section is used to record the Initial assessment, Past Medical History, Family History and Social History (see Fig 7)
- Initial Assessment – The initial assessment includes the date of assessment, filled in by the user, along with key details such as the type of diabetes, date of diagnosis or treatment initiation, and diagnosis at the facility. It also captures the entry point at the time of diagnosis, presence of diabetic ketoacidosis (DKA), signs and symptoms at diagnosis, other relevant symptoms, and any prior operations.
- Past Medical History – This section allows user to record for mental health disorders, celiac disease, thyroid disorders, and other potential health risks.
- Family History – This section captures the Family T1D history and Family history for other diseases.
- Social History – This section captures key demographic and lifestyle factors, including the patient's education level, parental education levels, household size, and annual income. It also assesses smoking habits, weekly alcohol consumption, dietary patterns, and physical activity levels from the past week.
- Notes – For doctor to record any important information for the patient.
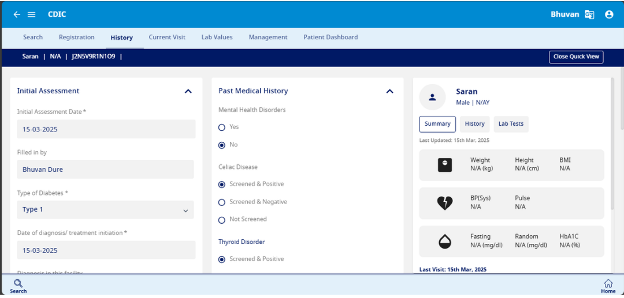
Current Visits
This section is designed to capture data related to Assessment, Complications and Clinical measures (Fig 8)
- Assessment – Enter the date and reason for today's visit, along with current and other symptoms. Record any adverse events since the last visit. If an emergency visit occurs, provide the date, reason, and admission details, including ICU requirements. For glucose monitoring, specify whether a continuous glucose sensor is in use and upload or manually enter CGM data using the logbook function.
- Complications – Indicate whether the patient has experienced any complications, including foot ulcer, myocardial infarction (MI), or cerebrovascular accident (CVA) by selecting Yes, No, or Unknown as applicable.
- Clinical Measure – Record the patient's weight, height, blood glucose levels (fasting, random, and glycemia), blood pressure (systolic and diastolic), pulse rate, Tanner pubertal stage, and urine ketones test results. BMI and BMI Z score are automatically calculated by the system based on entered weight and height.
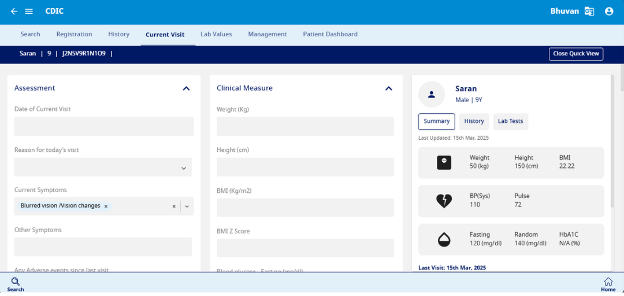
Lab Values
This section is designed to capture data related to the lab investigation information related to the patient with T1D comprising of Basic tests, Thyroid Function tests, Pancreatic Function and Auto Immune Markers, Lipid Tests and Urine and Kidney Function Tests. (Fig 9)
- Basic Tests: Record laboratory values for HbA1C, fasting blood glucose, and 2-hour postprandial blood glucose. Enter Complete Blood Count (CBC) parameters, including hemoglobin, RBC, WBC, platelets, neutrophils, lymphocytes, monocytes, eosinophils, and basophils. If conducting an Oral Glucose Tolerance Test (OGTT), document blood glucose levels at fasting (zero sample), 30 min, 60 min, 90 min, 120 min, 150 min, and 180 min.
- Thyroid Function Tests – Record thyroid function test results, including TSH, Free T4, Thyroid Peroxidase Antibody (IU/ml), and Antithyroglobulin Antibody levels.
- Pancreatic Function and Auto-Immune Markers – Record the C-Peptide and Pancreatic Antibodies.
- Lipid Tests – Record the patient's Total Cholesterol, LDL Cholesterol, HDL Cholesterol, and Triglyceride levels in mg/dL.
- Urine and Kidney Function Tests – Record the Urine Creatinine and Microalbuminuria test for nephropathy.
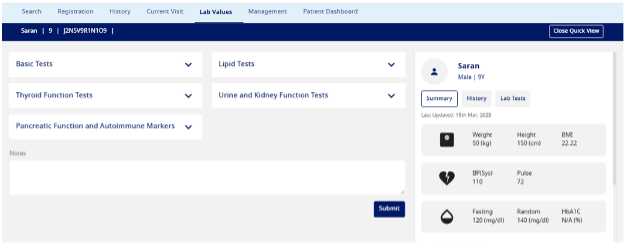
Management
- This section is designed to capture data related to Medical therapy and Outcome (Fig 10). The prescription can be printed from this section (Fig 11).
- Medical Therapy – Enter the medication name, regimen type, and type of insulin prescribed. Specify whether it is taken before or after meals, the dosage (00-00-00-00 format), and the course duration in days.
- Outcome – Can record if there are any changes in the status of the patient.
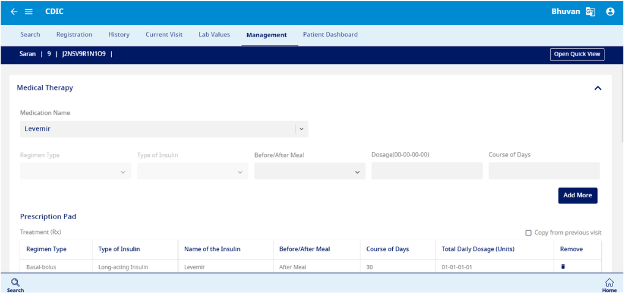

Patient Dashboard
The Patient Dashboard provides a comprehensive summary of the patient's medical records, enabling easy tracking of health status and treatment progress. (Fig 12 to 14)
a. Patient Information & Contact Details
Displays basic demographic details, including name, age, gender, date of birth, region, address, and contact details of the patient and guardian. It also records date of enrollment, religion, national ID number, insurance status, education level, household income, and parental mortality status to provide a holistic patient profile.
b. Appointment & Visit History
- Shows upcoming visits and the last recorded visit date.
- Displays appointment history, though currently no details are found for this patient.
c. Basic Lab Values & Health Metrics
Tracks key health indicators with the latest test results and dates, including:
- HbA1C – Glycaemic control monitoring
- Blood Glucose Levels (Fasting & Random) (mg/dL) – Indicates blood sugar fluctuations
- Blood Pressure (Systolic/Diastolic) (mmHg) – Indicates cardiovascular health
- BMI – Assesses body weight in relation to height
- Total Cholesterol & Triglycerides (mg/dL) – Lipid profile assessment
- TSH – Evaluates thyroid function
d. Health Trends & Monitoring
Graphical representations and trend charts for:
- HbA1C levels over time
- Glucose fluctuations (fasting & random)
- Blood pressure monitoring
- BMI trends
e. Risk Factors
Identifies potential health risks that may impact the patient's condition:
- Smoking history
- Alcohol consumption
- Celiac disease
- Mental health disorders
f. Complications Tracking
Monitors diabetes-related and other complications, including:
- Retinopathy (eye damage due to diabetes)
- Nephropathy (kidney disease)
- Diabetic Ketoacidosis (DKA)
- Cerebrovascular Accident (CVA – Stroke)
- Hyperglycaemia (high blood sugar levels)
![]()
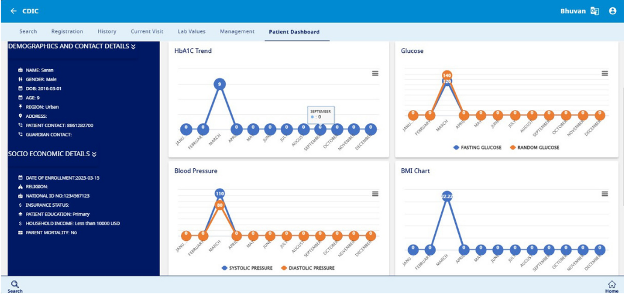
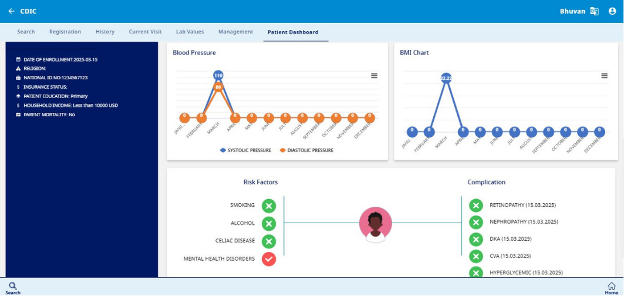
Managing Records
In the due course of treatment, it is anticipated that the patient will be visiting the facility once in three months to review and update their treatment plan. New information related to their treatment can be recorded in the Patient Record List section (Fig 15). Click on the patient record list button on the homepage or select the option from the side menu.
- Use the search bar to pull the pertinent patient record from the database.
- Click on the edit option (pencil icon) to enter new information related to that patient.
- For changes related to the Registration section, update the new information in the field, and it will be reflected in the database (example: insurance status, number of people in household).
- For recording the new information related to the clinical data, start recording from the field – Date of current visit and follow the variables listed in this section.
- The fields will start from the blank values so you can enter new information.
- When done, click on Submit.
- Follow steps 5-7 for each stage till you reach the Patient Dashboard section.
- Post a review; you can export the case report as a pdf by clicking on the 'Download Summary' button.
- Click on the home icon at the bottom of the screen to be redirected to the Homepage.
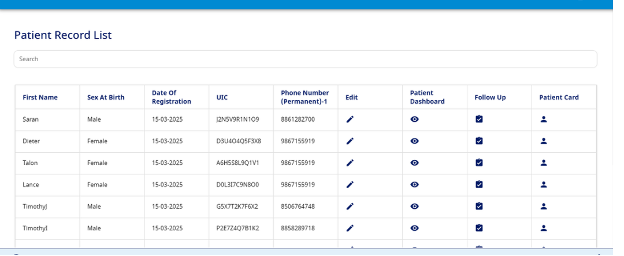
Follow Up
This section lists all patients due for follow-up, ordered chronologically from the most recent pending visit to the latest scheduled date.
Clicking on the patient record, the tab opens up to indicate the details of the patient such as Name, Date of registration and UIC number and Patient contact Number. Upon clicking "Follow up" the continuum of care details from Current visit > Lab values > Management > and Patient Dashboard can be accessed and updated for the latest visit.
Appointment
This section opens the calendar to view the appointments fixed with the patients. Appointment can also be fixed from this column by clicking on the "Add New" tab. (Fig 16)


B. Add Templates in Prescription Pad
This features helps to streamline repetitive data entry by allowing users to create templates of the commonly prescribed drugs in prescription and pre-select these templates whenever needed.
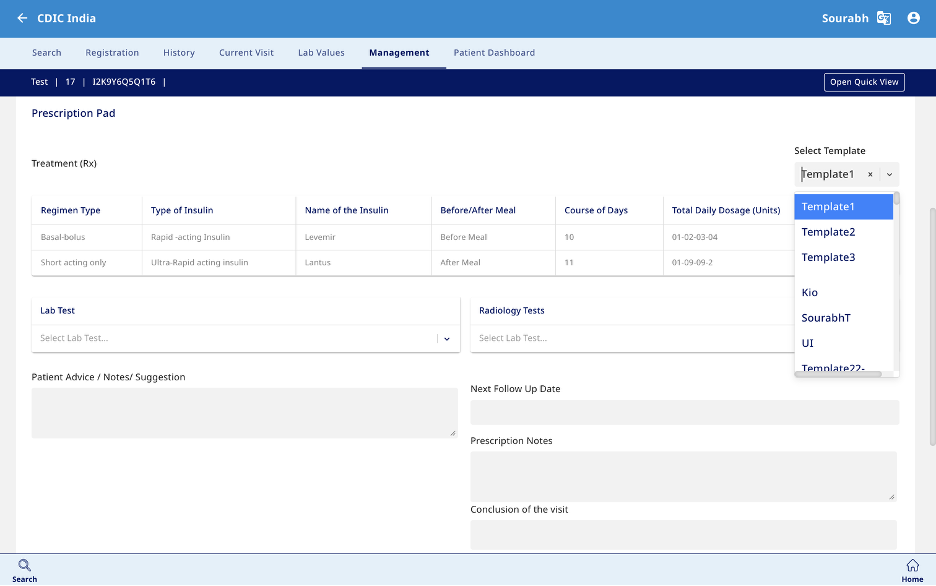
Steps to Add a New Template:
- Open Management Page → Prescription Pad
- Click on 'Add Medication' from top right corner.
- Fill in the prescription pad.
- You will be able to see the field - Enter Template Name, choose any relevant name for the template.
- This should be followed by clicking on 'Save Template'.
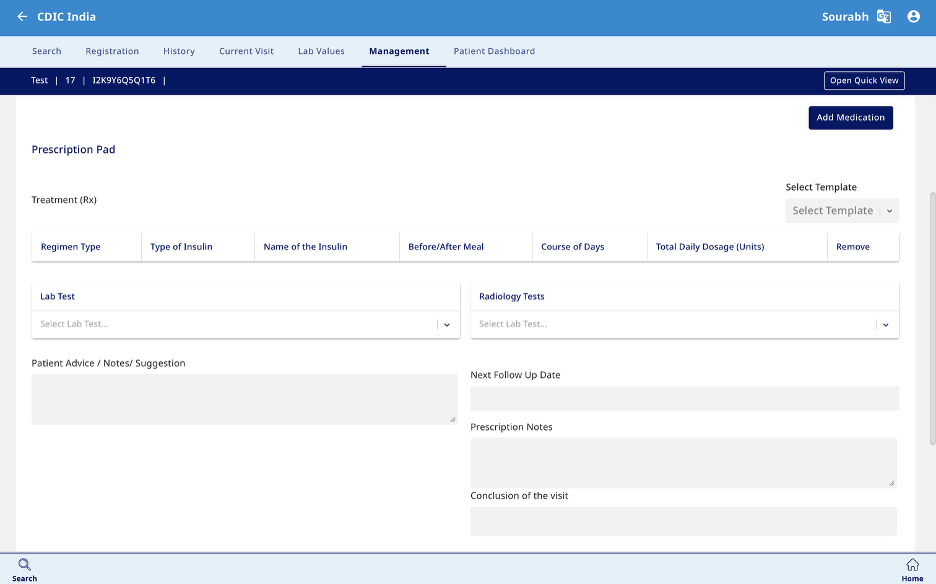
Steps to select a saved template:
- Open Management Page → Prescription Pad
- Click on 'Select Template' from top right corner.
- You will be able to view and select from the list of all your saved templates.
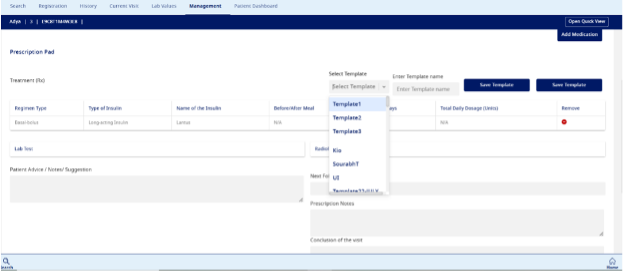
Best Practices & Tips
Efficient and accurate data entry is crucial for maintaining the integrity and usability of the T1D e-Registry. Follow these best practices to ensure smooth operations and high-quality patient records.
Data Entry Best Practices
- Ensure Accuracy: Always verify patient information before submitting entries. Double-check for errors in names, dates, and numerical values.
- Consistent Formatting: Capitalize the first letter of names and match the spelling to official government-issued IDs.
- Avoid Duplication: Before registering a new patient, use the search function to confirm they are not already in the system.
- Complete Information: Fill in all required fields to maintain a comprehensive medical record for each patient.
Security & Compliance
- Maintain Confidentiality: Never share your login credentials. Each user must access the system with their authorized credentials only.
- Secure Logout: Always log out after completing data entry to prevent unauthorized access to patient records.
- Use Authorized Credentials: Do not use the default test credentials for entering real patient data.
System Navigation Tips
- Use Quick Search: Utilize the search function by entering a patient's Name or UID to locate records efficiently.
- Regularly Update Records: Each patient visit should be recorded with updated details, including new clinical data, lab values, and treatment adjustments.
- Leverage Dashboard Insights: Monitor patient progress using the visual trends and health indicators provided on the dashboard.
Efficient Appointment & Follow-Up Management
- Check Follow-Up Listings: The follow-up section displays patients due for check-ups—prioritize these to maintain continuity of care.
- Schedule Appointments in Advance: Use the appointment calendar to track upcoming visits and avoid missed follow-ups.
Troubleshooting & Support
- Syncing Issues: If the system takes longer than expected to sync, refresh the page or check your internet connection.
- Technical Support: If you encounter system errors or need guidance, refer to the Appendix or contact the support team for assistance.
Video Tutorials
T1D Registry
Aggregated Dashboard
Patient Profile
Links
- Registry (webapp) - CDIC-WebApp-Registry
- Admin Module - CDIC-Admin-Module
- Smart Setup - CDIC-Smart-Setup
- Backend service - CDIC-Backend-Service
Community
Contact us
Please reach out to us at contactus@t1dreg.com, if you have questions about the implementation of the registry.

GET IN TOUCH WITH US
Please complete the form and we will get back to you